一、概述 1.1 什么是 GitLab GitLab 是一个开源的一体化 DevOps 平台,提供 Git 仓库托管、CI/CD、代码评审、Issue 跟踪、Wiki、容器镜像仓库等完整功能。社区版(CE)免费开源,适合个人、小团队及企业内部自建代码托管平台。
1.2 为什么选择 Docker Compose 部署
部署方式
优点
缺点
包管理器(Omnibus)
官方推荐、组件完整
与系统耦合深、迁移复杂
Docker Compose 环境隔离、易于迁移、配置集中、一键启停 需要熟悉 Docker
Kubernetes Helm
云原生、弹性伸缩
复杂度高、资源开销大
Docker Compose 是单机/小规模生产部署的最佳平衡点:环境隔离 + 配置即代码 + 易于备份迁移 。
1.3 部署架构 1 2 3 4 5 6 7 8 9 10 11 12 13 14 15 16 17 ┌─────────────────────────────────────────────┐ │ Linux 宿主机 │ │ ┌───────────────────────────────────────┐ │ │ │ Docker Compose 管理的 gitlab 容器 │ │ │ │ ┌─────────┐ ┌─────────┐ ┌─────────┐ │ │ │ │ │ Nginx │ │ Puma │ │Sidekiq │ │ │ │ │ │ (Web) │ │ (Rails) │ │ (异步) │ │ │ │ │ └─────────┘ └─────────┘ └─────────┘ │ │ │ │ ┌─────────┐ ┌─────────┐ ┌─────────┐ │ │ │ │ │PostgreSQL│ │ Redis │ │ Gitaly │ │ │ │ │ └─────────┘ └─────────┘ └─────────┘ │ │ │ └───────────────────────────────────────┘ │ │ 挂载卷: │ │ ./gitlab/config → /etc/gitlab │ │ ./gitlab/logs → /var/log/gitlab │ │ ./gitlab/data → /var/opt/gitlab │ └─────────────────────────────────────────────┘
二、环境准备 2.1 硬件要求
规模
CPU
内存
磁盘
适用场景
最小
2 核
4 GB
20 GB
个人/测试(≤20 用户)
推荐
4 核
8 GB
100 GB SSD
小团队(≤100 用户)
生产
8 核+
16 GB+
500 GB+ SSD
中型团队(≤500 用户)
内存低于 4GB 会导致 GitLab 启动失败或频繁 OOM 。GitLab 官方最低要求 4GB(含 Swap),推荐 8GB。
2.2 软件要求
软件
最低版本
推荐版本
Linux Kernel
3.10+
5.x+
Docker
20.10+
24.x+
Docker Compose
v2.0+
v2.20+
Git
任意
2.x
2.3 端口规划
端口
用途
说明
80
GitLab Web 页面、HTTP Clone
必须对外开放
2222
Git over SSH
建议改为非 22 端口,避免与宿主机 SSH 冲突
2.4 系统检查 1 2 3 4 5 6 7 8 9 10 11 12 13 cat /etc/os-releaseuname -rlscpu free -h df -hss -tlnp | grep -E ':(80|443|22)\b'
2.5 关闭/配置防火墙与 SELinux CentOS / Rocky / RHEL:
1 2 3 4 5 6 7 8 9 10 11 12 13 sudo firewall-cmd --permanent --add-port=80/tcpsudo firewall-cmd --permanent --add-port=443/tcpsudo firewall-cmd --permanent --add-port=2222/tcp sudo firewall-cmd --reloadsudo systemctl stop firewalldsudo systemctl disable firewalldsudo setenforce 0sudo sed -i 's/^SELINUX=enforcing/SELINUX=permissive/' /etc/selinux/config
Ubuntu / Debian:
1 2 3 4 5 sudo ufw allow 80/tcpsudo ufw allow 443/tcpsudo ufw allow 2222/tcpsudo ufw reload
2.6 配置 Swap(内存 ≤ 4GB 必做) 1 2 3 4 5 6 7 8 9 10 11 sudo fallocate -l 4G /swapfilesudo chmod 600 /swapfilesudo mkswap /swapfilesudo swapon /swapfileecho '/swapfile none swap sw 0 0' | sudo tee -a /etc/fstabfree -h
三、安装 Docker 与 Docker Compose
本章节保留通用版本,适用于 CentOS 7/8、Rocky Linux、Ubuntu/Debian 等其他发行版。
3.1 CentOS / Rocky / RHEL(CentOS 8+ 推荐使用 dnf) 1 2 3 4 5 6 7 8 9 10 11 12 13 14 15 16 17 18 19 20 21 22 23 24 25 26 27 28 29 30 31 32 33 34 sudo yum remove -y docker docker-client docker-client-latest docker-common \ docker-latest docker-latest-logrotate docker-logrotate docker-engine sudo yum install -y yum-utils device-mapper-persistent-data lvm2sudo yum-config-manager --add-repo https://mirrors.aliyun.com/docker-ce/linux/centos/docker-ce.repoyum repolist | grep docker yum list docker-ce --showduplicates | sort -r sudo yum install -y docker-ce docker-ce-cli containerd.io docker-buildx-plugin docker-compose-pluginsudo systemctl enable --now dockerdocker --version docker compose version
3.2 Ubuntu / Debian 1 2 3 4 5 6 7 8 9 10 11 12 13 14 15 16 17 18 19 20 21 22 23 24 25 26 27 28 29 30 31 sudo apt-get remove -y docker docker-engine docker.io containerd runcsudo apt-get updatesudo apt-get install -y ca-certificates curl gnupg lsb-releasesudo install -m 0755 -d /etc/apt/keyringscurl -fsSL https://mirrors.aliyun.com/docker-ce/linux/ubuntu/gpg | \ sudo gpg --dearmor -o /etc/apt/keyrings/docker.gpg sudo chmod a+r /etc/apt/keyrings/docker.gpgecho \ "deb [arch=$(dpkg --print-architecture) signed-by=/etc/apt/keyrings/docker.gpg] \ https://mirrors.aliyun.com/docker-ce/linux/ubuntu \ $(. /etc/os-release && echo "$VERSION_CODENAME " ) stable" | \ sudo tee /etc/apt/sources.list.d/docker.list > /dev/null sudo apt-get updatesudo apt-get install -y docker-ce docker-ce-cli containerd.io \ docker-buildx-plugin docker-compose-plugin sudo systemctl enable --now dockerdocker --version docker compose version
3.3 配置 Docker daemon.json Docker 的全部行为由 /etc/docker/daemon.json 控制。安装后必须先配置再拉镜像。
场景 A:国际网络(无需镜像加速) 1 2 3 4 5 6 7 8 9 10 11 12 13 14 15 16 17 18 19 20 21 sudo mkdir -p /etc/docker /data/dockersudo tee /etc/docker/daemon.json <<-'EOF' { "data-root" : "/data/docker" , "log-driver" : "json-file" , "log-opts" : { "max-size" : "100m" , "max-file" : "3" }, "storage-driver" : "overlay2" , "live-restore" : true , "default-ulimits" : { "nofile" : { "Name" : "nofile" , "Hard" : 65536, "Soft" : 65536 } } } EOF
场景 B:国内网络(需镜像加速) 1 2 3 4 5 6 7 8 9 10 11 12 13 14 15 16 17 18 19 20 21 22 23 24 25 26 sudo mkdir -p /etc/docker /data/dockersudo tee /etc/docker/daemon.json <<-'EOF' { "data-root" : "/data/docker" , "registry-mirrors" : [ "https://docker.m.daocloud.io" , "https://dockerproxy.net" , "https://mirror.ccs.tencentyun.com" ], "log-driver" : "json-file" , "log-opts" : { "max-size" : "100m" , "max-file" : "3" }, "storage-driver" : "overlay2" , "live-restore" : true , "default-ulimits" : { "nofile" : { "Name" : "nofile" , "Hard" : 65536, "Soft" : 65536 } } } EOF
配置项说明
配置
说明
data-rootDocker 数据根目录 ,指向 /data 外挂盘,镜像/容器/卷全放这里,避免撑爆根分区
registry-mirrors镜像加速器,国际网络可删除此项;国内必加
log-driver + log-opts容器日志单文件 ≤100MB,最多保留 3 个滚动文件
storage-driveroverlay2,CentOS/Ubuntu 默认,显式声明更可靠
live-restoreDocker 守护进程重启时容器不中断,GitLab 场景必需
default-ulimits文件句柄上限,GitLab 的 PostgreSQL/Gitaly 需要,避免 Too many open files
应用配置 1 2 3 4 5 6 sudo systemctl daemon-reloadsudo systemctl restart dockerdocker info | grep "Docker Root Dir"
3.4 将当前用户加入 docker 组(可选) 1 2 3 sudo usermod -aG docker $USER newgrp docker docker ps
3.5 配置 containerd 数据目录 containerd 是 Docker 底层的容器运行时,镜像拉取的原始 blob 数据默认存在 /var/lib/containerd/(几百 MB~数 GB)。为了彻底释放根分区,一并移到 /data。
1 2 3 4 5 6 7 8 9 10 11 12 13 14 15 16 17 18 19 sudo mkdir -p /data/containerd /etc/containerdsudo containerd config default | sudo tee /etc/containerd/config.tomlsudo sed -i 's|root = "/var/lib/containerd"|root = "/data/containerd"|' /etc/containerd/config.tomlgrep 'root =' /etc/containerd/config.toml sudo systemctl restart containerdsudo systemctl restart dockerls /data/containerd/
如果 containerd 已运行并拉过镜像,原 /var/lib/containerd/ 下有历史数据。确认新路径下一切正常后,删除旧目录:
1 sudo rm -rf /var/lib/containerd
最终磁盘布局 1 2 3 4 5 6 7 8 9 10 11 12 /data/ ├── docker/ ← Docker 全部数据(daemon.json: data-root) │ ├── overlay2/ │ ├── containers/ │ └── volumes/ ├── containerd/ ← containerd 数据(config.toml: root) │ ├── io.containerd.content.v1.content/ │ └── io.containerd.snapshotter.v1.overlayfs/ └── gitlab/ ← GitLab 仓库与数据库(docker-compose bind mount) ├── config/ ├── logs/ └── data/
至此,Docker + containerd + GitLab 的所有数据全部落在 /data 外挂盘,根分区不再增长。
四、规划 GitLab 部署目录 4.1 推荐目录结构 1 2 3 4 5 6 7 8 9 10 sudo mkdir -p /data/gitlab/{config,logs,data}cd /data/gitlab/data/gitlab/ ├── docker-compose.yml ├── config/ ├── logs/ └── data/
重要 :data/ 目录包含全部 Git 仓库、PostgreSQL 数据、Redis 数据、用户上传文件,务必备份此目录 。
4.2 权限说明 GitLab 容器内部以 git 用户(UID 998)运行 PostgreSQL 等组件。在 Linux 宿主机上无需手动 chown ,Docker 会在首次启动时自动处理。如遇权限问题,参考 十五、常见故障排查 。
五、编写 docker-compose.yml 5.1 最小可用版本 在 /data/gitlab/ 下创建 docker-compose.yml:
1 2 3 4 5 6 7 8 9 10 11 12 13 14 15 16 17 18 19 20 21 22 23 24 25 26 services: gitlab: image: gitlab/gitlab-ce:18.11.7-ce.0 container_name: gitlab restart: always hostname: 'gitlab.example.com' environment: GITLAB_OMNIBUS_CONFIG: | external_url 'http://gitlab.example.com' gitlab_rails['gitlab_shell_ssh_port'] = 2222 ports: - '80:80' - '443:443' - '2222:22' volumes: - ./config:/etc/gitlab - ./logs:/var/log/gitlab - ./data:/var/opt/gitlab shm_size: '256m' healthcheck: test: ["CMD" , "curl" , "-f" , "http://localhost/-/health" ] interval: 30s timeout: 10s retries: 5 start_period: 300s
5.2 关键字段说明
字段
说明
image锁定具体版本号,避免 latest 带来的不可预期升级
hostname必须与 external_url 的主机部分一致,否则仓库 clone URL 会异常
external_urlGitLab 对外访问地址,决定 Web URL、Clone URL、回调 URL
gitlab_shell_ssh_port对外暴露的 SSH 端口(避免与宿主机 22 冲突)
shm_size共享内存,PostgreSQL 需要,至少 256MB
restart: always容器异常退出自动重启
5.3 镜像版本选择 访问 GitLab CE Docker Hub Tags 选择版本:
生产环境 :使用具体版本号,如 18.11.7-ce.0测试环境 :可用 latest,但不推荐生产使用
1 2 docker pull gitlab/gitlab-ce:18.11.7-ce.0
六、首次启动与初始化 6.1 启动 1 2 3 4 5 6 7 cd /data/gitlabdocker compose up -d docker compose logs -f gitlab
6.2 启动过程观察 首次启动会执行以下操作(日志中可见):
初始化 PostgreSQL 数据库
执行数据库 migration
生成 SSH host key、secrets
编译 assets(前端资源)
启动所有服务(Puma、Sidekiq、Nginx、Gitaly 等)
判断启动完成 :日志出现 gitlab Reconfigured! 或访问 http://你的IP/-/health 返回 GitLab OK。
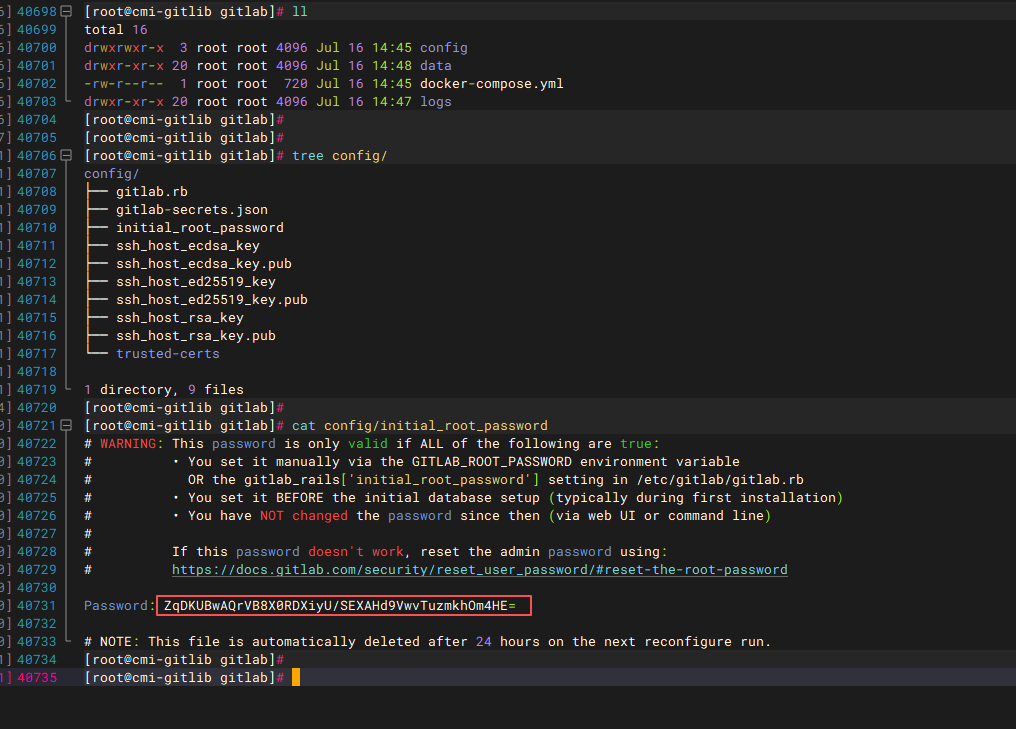
6.3 查看初始 root 密码 1 2 3 4 5 docker exec -it gitlab cat /etc/gitlab/initial_root_password sudo cat /data/gitlab/config/initial_root_password
输出示例:
1 2 3 4 5 6 7 8 9 # WARNING: This value is valid only in the following conditions # 1. If provided manually (either via `GITLAB_ROOT_PASSWORD` environment variable or via `gitlab_rails['initial_root_password']` setting in `gitlab.rb`, it was provided before database was seeded for the first time (usually, the first reconfigure run). # 2. Password hasn't been changed manually, either via UI or via command line. # # If the password shown here doesn't work, you must reset the admin password following https://docs.gitlab.com/ee/security/reset_user_password.html#reset-your-root-password. Password: xxxxxxxxxxxxxxxxxxxxxxxx # NOTE: This file will be automatically deleted in the first reconfigure run after 24 hours.
该文件 24 小时后自动删除,请立即保存密码并登录后修改 。
七、访问验证与初始登录 7.1 访问 Web UI 浏览器访问 http://gitlab.example.com(或 http://服务器IP):
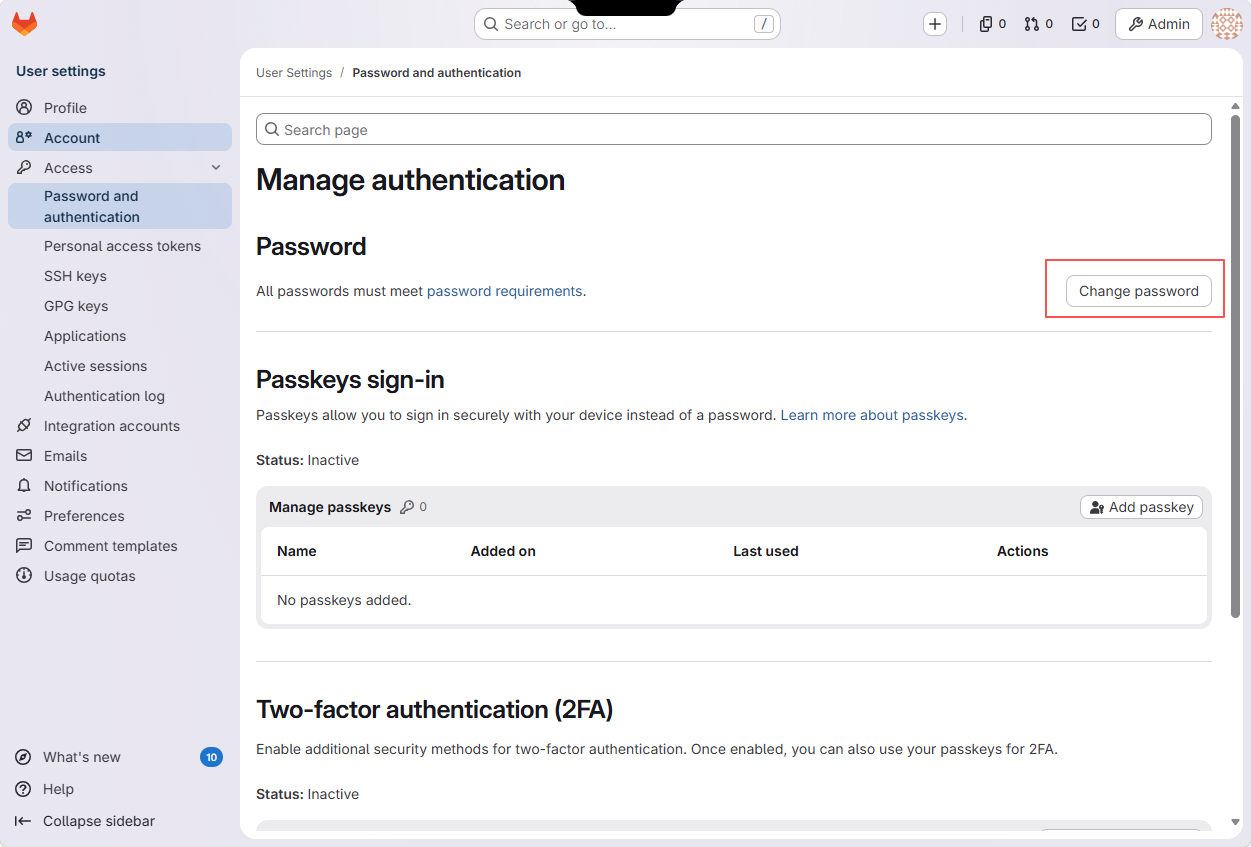
7.2 立即修改 root 密码 登录后:右上角头像 → Preferences →Password and authentication → ,设置强密码并保存。
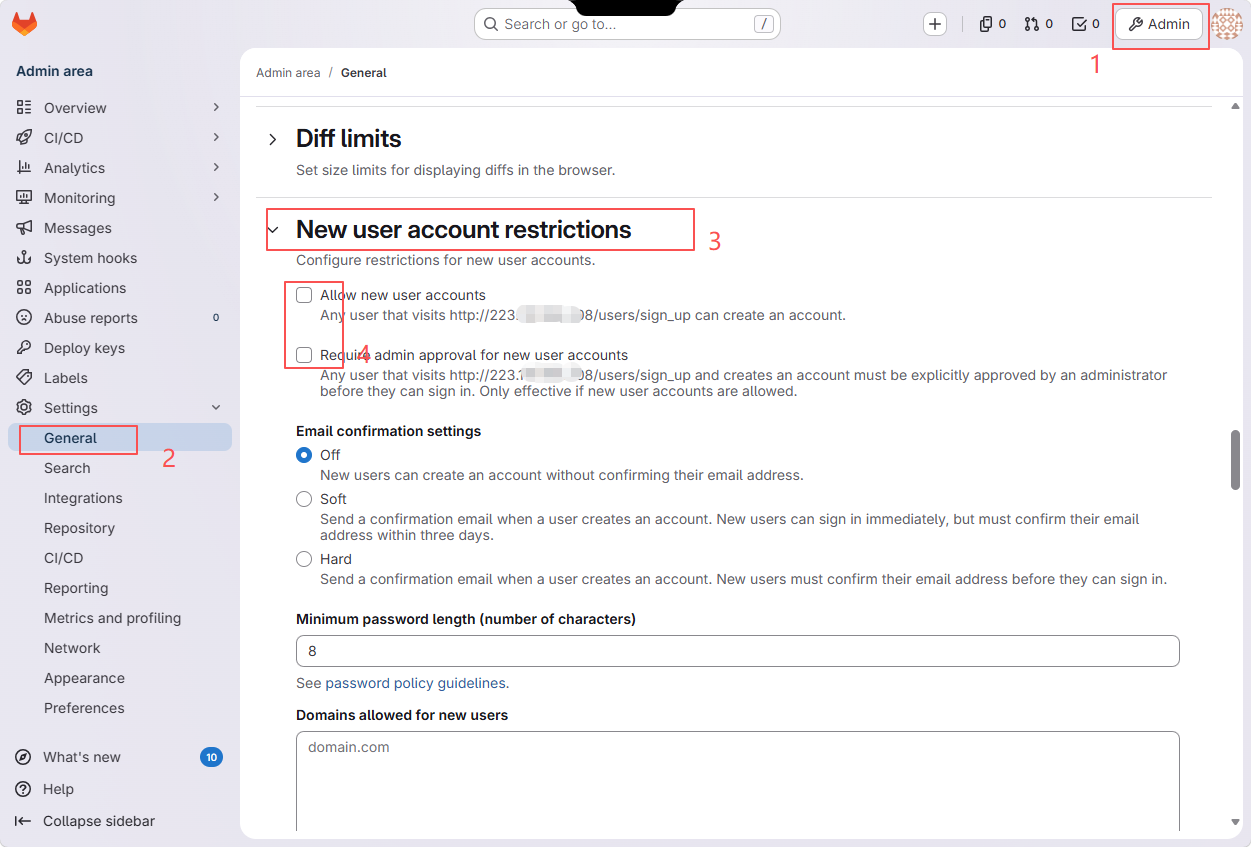
7.3 关闭公开注册(生产必做) Admin Area → Settings → General → New user account restrictions :
取消勾选 Allow new user accounts
保存更改
7.4 健康检查端点 1 2 3 4 5 6 7 8 curl http://localhost/-/health curl http://localhost/-/readiness curl http://localhost/-/liveness
八、核心配置详解(gitlab.rb) GitLab 的所有配置都通过 gitlab.rb 文件管理。在 Docker 部署中,有两种修改方式:
8.1 方式一:通过 GITLAB_OMNIBUS_CONFIG(推荐用于少量配置) 在 docker-compose.yml 中:
1 2 3 4 5 6 environment: GITLAB_OMNIBUS_CONFIG: | external_url 'https://gitlab.example.com' gitlab_rails['gitlab_shell_ssh_port'] = 2222 gitlab_rails['time_zone'] = 'Asia/Shanghai' puma['worker_processes'] = 4
8.2 方式二:直接编辑挂载的 gitlab.rb(推荐用于大量配置) 1 2 3 4 5 6 sudo vi /data/gitlab/config/gitlab.rbdocker exec -it gitlab gitlab-ctl reconfigure docker exec -it gitlab gitlab-ctl restart
8.3 常用配置项 1 2 3 4 5 6 7 8 9 10 11 12 13 14 15 16 17 18 19 20 external_url 'https://gitlab.example.com' gitlab_rails['gitlab_shell_ssh_port' ] = 2222 gitlab_rails['time_zone' ] = 'Asia/Shanghai' puma['worker_processes' ] = 4 sidekiq['max_concurrency' ] = 25 postgresql['shared_buffers' ] = "1GB" postgresql['max_worker_processes' ] = 8 gitlab_rails['gitlab_default_branch' ] = 'main' gitlab_rails['session_expire_delay' ] = 10080 gitlab_rails['usage_ping_enabled' ] = false gitlab_rails['gitlab_default_projects_features_container_registry' ] = false
修改后必须执行:
1 docker exec -it gitlab gitlab-ctl reconfigure
九、中文配置 GitLab 从 10.0 版本起内置中文语言包,无需安装任何额外插件。
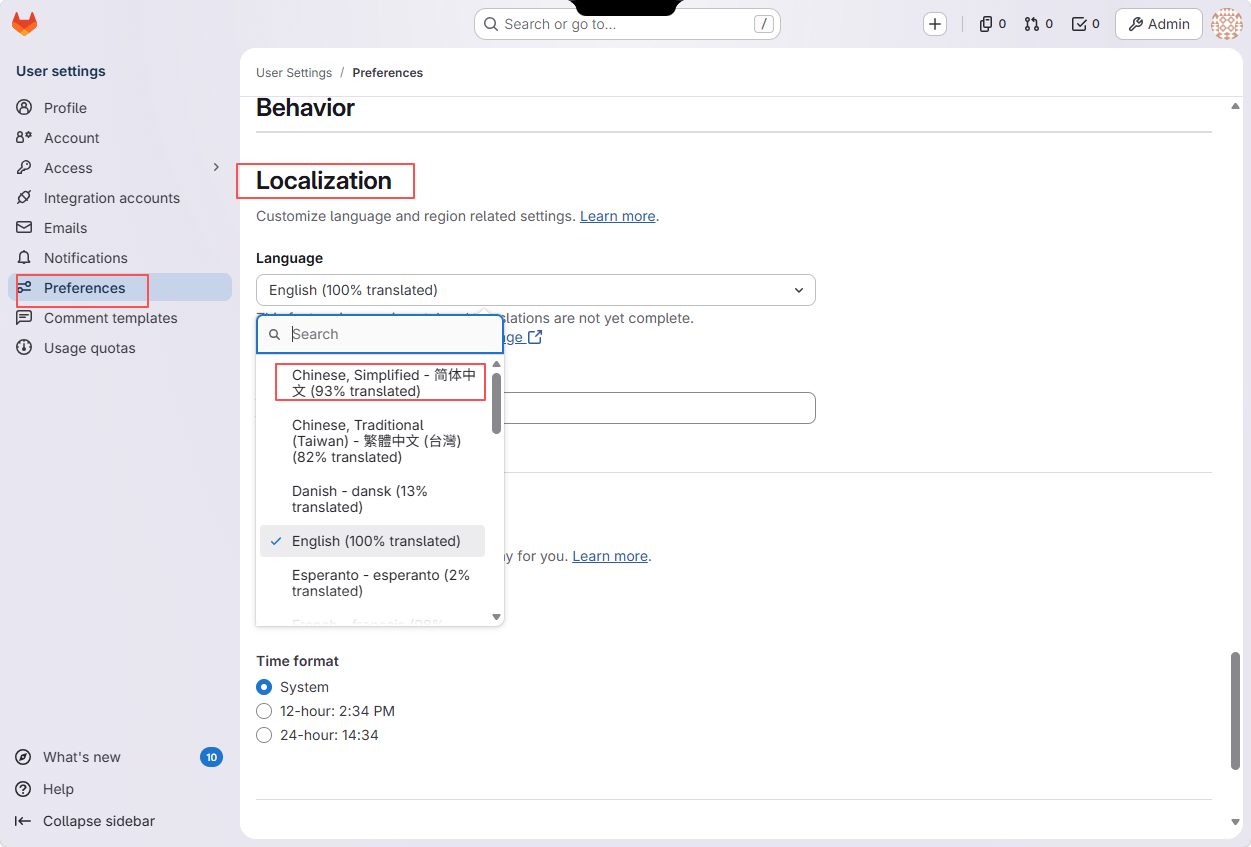
9.1 个人切换中文 个人设置不影响其他用户,改完立即生效:
右上角头像 → Preferences
左侧菜单 → Localization
Language 下拉选 中文简体(Chinese, Simplified - 简体中文) 翻到底部点 Save changes
刷新页面(F5)
9.2 全局默认中文 所有新用户和未设置语言的用户默认显示中文。已登录且设过偏好语言的老用户不受影响。
1 2 3 4 5 6 7 8 9 sudo sed -i "/^# gitlab_rails\['default_locale'/c\gitlab_rails['default_locale'] = 'zh_CN'" /data/gitlab/config/gitlab.rbgrep -q "gitlab_rails\['default_locale'\]" /data/gitlab/config/gitlab.rb || \ echo "gitlab_rails['default_locale'] = 'zh_CN'" | sudo tee -a /data/gitlab/config/gitlab.rb docker exec -it gitlab gitlab-ctl reconfigure
9.3 验证 1 2 3 grep "default_locale" /data/gitlab/config/gitlab.rb
退出登录或打开无痕窗口访问 GitLab 首页,即可看到中文界面。
GitLab 中文覆盖率约 95%+,项目管理、代码评审、CI/CD、设置等核心功能均已汉化。
十、SMTP 邮件配置 GitLab 需要 SMTP 来发送注册确认、密码重置、流水线通知等邮件。
10.1 通用 SMTP(以 QQ 邮箱为例) 1 2 3 4 5 6 7 8 9 10 11 gitlab_rails['smtp_enable' ] = true gitlab_rails['smtp_address' ] = "smtp.qq.com" gitlab_rails['smtp_port' ] = 465 gitlab_rails['smtp_user_name' ] = "your_qq@qq.com" gitlab_rails['smtp_password' ] = "授权码(非QQ密码)" gitlab_rails['smtp_domain' ] = "smtp.qq.com" gitlab_rails['smtp_authentication' ] = "login" gitlab_rails['smtp_enable_starttls_auto' ] = true gitlab_rails['smtp_tls' ] = true gitlab_rails['gitlab_email_from' ] = 'your_qq@qq.com' gitlab_rails['gitlab_email_reply_to' ] = 'your_qq@qq.com'
10.2 阿里云邮件推送 1 2 3 4 5 6 7 8 9 10 gitlab_rails['smtp_enable' ] = true gitlab_rails['smtp_address' ] = "smtpdm.aliyun.com" gitlab_rails['smtp_port' ] = 465 gitlab_rails['smtp_user_name' ] = "gitlab@mail.example.com" gitlab_rails['smtp_password' ] = "SMTP密码" gitlab_rails['smtp_domain' ] = "example.com" gitlab_rails['smtp_authentication' ] = "login" gitlab_rails['smtp_enable_starttls_auto' ] = false gitlab_rails['smtp_tls' ] = true gitlab_rails['gitlab_email_from' ] = 'gitlab@mail.example.com'
10.3 测试邮件发送 1 2 3 4 5 6 7 8 docker exec -it gitlab gitlab-rails console Notify.test_email('your_email@example.com' , 'GitLab Test' , 'This is a test email.' ).deliver_now exit
十一、数据备份与恢复 11.1 备份策略 GitLab 备份包含两部分:
内容
备份方式
默认位置
应用数据(仓库、数据库、上传文件)
gitlab-backup createdata/backups/
配置文件(gitlab.rb、secrets)
手动复制
config/
两者缺一不可 。缺少 config/gitlab-secrets.json 会导致恢复后无法解密数据库中的敏感字段。
11.2 手动备份 1 2 3 4 5 6 7 8 docker exec -it gitlab gitlab-backup create STRATEGY=copy sudo tar -czvf gitlab-config-$(date +%Y%m%d).tar.gz -C /data/gitlab config .ls -lh /data/gitlab/data/backups/
备份文件命名格式:1690000000_2024_07_22_16.11.0_gitlab_backup.tar
11.3 定时备份(crontab) 添加:
1 2 3 4 # 每天凌晨 2 点备份,保留最近 7 天 0 2 * * * docker exec gitlab gitlab-backup create STRATEGY=copy CRON=1 0 3 * * * find /data/gitlab/data/backups -name "*_gitlab_backup.tar" -mtime +7 -delete 0 4 * * * tar -czf /backup/gitlab-config-$(date +\%Y\%m\%d).tar.gz -C /data/gitlab config && find /backup -name "gitlab-config-*.tar.gz" -mtime +7 -delete
CRON=1 会在备份完成后输出 Backup completed,且不打印冗余日志。
11.4 远程备份(可选) 1 2 rclone sync /data/gitlab/data/backups remote:gitlab-backups --config ~/.config/rclone/rclone.conf
11.5 恢复 前提 :恢复目标 GitLab 版本必须与备份版本完全一致 。
1 2 3 4 5 6 7 8 9 10 11 12 13 14 15 16 17 18 19 docker exec -it gitlab gitlab-ctl stop puma docker exec -it gitlab gitlab-ctl stop sidekiq sudo cp 1690000000_2024_07_22_16.11.0_gitlab_backup.tar /data/gitlab/data/backups/docker exec -it gitlab gitlab-backup restore BACKUP=1690000000_2024_07_22_16.11.0 sudo tar -xzvf gitlab-config-20240722.tar.gz -C /data/gitlabdocker exec -it gitlab gitlab-ctl reconfigure docker exec -it gitlab gitlab-ctl restart docker exec -it gitlab gitlab-rake gitlab:check SANITIZE=true
十二、版本升级 12.1 升级原则
12.2 升级步骤 1 2 3 4 5 6 7 8 9 10 11 12 13 14 15 16 17 18 docker exec -it gitlab gitlab-backup create STRATEGY=copy docker compose pull docker compose down docker compose up -d docker compose logs -f gitlab docker exec -it gitlab gitlab-rake gitlab:check SANITIZE=true
12.3 升级失败回滚 十三、日常运维命令 13.1 容器管理 1 2 3 4 5 6 7 8 9 10 11 12 13 docker compose up -d docker compose stop docker compose restart docker compose ps docker compose logs -f --tail =100 gitlab docker exec -it gitlab bash
13.2 GitLab 服务管理(容器内) 1 2 3 4 5 6 7 8 9 10 11 docker exec -it gitlab gitlab-ctl status docker exec -it gitlab gitlab-ctl restart puma docker exec -it gitlab gitlab-ctl restart sidekiq docker exec -it gitlab gitlab-ctl restart nginx docker exec -it gitlab gitlab-ctl tail puma docker exec -it gitlab gitlab-ctl tail postgresql
13.3 Rails 控制台(高级操作) 1 2 3 4 5 6 7 8 9 10 11 docker exec -it gitlab gitlab-rails console user = User.find_by_username('root' ) user.password = 'NewStrongPassword123!' user.password_confirmation = 'NewStrongPassword123!' user.save! user = User.find_by_email('user@example.com' ) user.unlock_access!
13.4 Rake 任务 1 2 3 4 5 6 7 8 docker exec -it gitlab gitlab-rake gitlab:check SANITIZE=true docker exec -it gitlab gitlab-rake gitlab:env :info docker exec -it gitlab gitlab-rake gitlab:cleanup:orphan_job_artifact_files
十四、性能调优 14.1 按服务器规格调整(以 4C8G 为例) 1 2 3 4 5 6 7 8 9 10 11 12 13 14 15 16 17 18 19 20 21 22 23 24 puma['worker_processes' ] = 3 puma['min_threads' ] = 4 puma['max_threads' ] = 4 sidekiq['max_concurrency' ] = 25 postgresql['shared_buffers' ] = "2GB" postgresql['max_worker_processes' ] = 8 postgresql['max_connections' ] = 400 redis['maxmemory' ] = "512mb" redis['maxmemory_policy' ] = "allkeys-lru" gitaly['configuration' ] = { concurrency: [ { rpc: "/gitaly.SmartHTTPService/PostReceivePack" , max_per_repo: 20 }, { rpc: "/gitaly.SSHService/SSHUploadPack" , max_per_repo: 20 }, ], }
14.2 关闭不需要的功能 1 2 3 4 5 6 7 8 9 10 11 12 13 14 15 gitlab_rails['usage_ping_enabled' ] = false registry['enable' ] = false mattermost['enable' ] = false prometheus_monitoring['enable' ] = false gitlab_rails['gitlab_default_projects_features_builds' ] = true gitlab_rails['gitlab_default_projects_features_container_registry' ] = false
14.3 日志清理 1 2 3 4 5 6 7 8 9 logging['logrotate_frequency' ] = "daily" logging['logrotate_rotate' ] = 7 logging['logrotate_compress' ] = "compress" nginx['logging_enabled' ] = true nginx['logrotate_frequency' ] = "daily" nginx['logrotate_rotate' ] = 7
14.4 监控指标 访问 http://gitlab.example.com/-/metrics(默认仅本地访问)。
十五、常见故障排查 15.1 启动失败:端口被占用 现象 :Error starting userland proxy: listen tcp4 0.0.0.0:80: bind: address already in use
解决 :
1 2 3 4 5 6 sudo ss -tlnp | grep :80sudo systemctl stop nginxsudo systemctl disable nginx
15.2 502 Bad Gateway 可能原因 :
GitLab 还在启动中(首次启动需 5~15 分钟)→ 等待
内存不足 → 增加内存或 Swap
Puma 崩溃 → 查看日志 docker exec -it gitlab gitlab-ctl tail puma
1 2 3 4 5 docker compose logs -f gitlab docker exec -it gitlab gitlab-ctl status puma
15.3 仓库 clone URL 显示错误 现象 :Web 界面显示的 SSH clone 地址端口不对。
解决 :确认 gitlab.rb 中:
1 2 external_url 'https://gitlab.example.com' gitlab_rails['gitlab_shell_ssh_port' ] = 2222
并执行 gitlab-ctl reconfigure。
15.4 忘记 root 密码 1 2 3 4 5 6 7 docker exec -it gitlab gitlab-rails console user = User.find_by_username('root' ) user.password = 'NewPassword123!' user.password_confirmation = 'NewPassword123!' user.save! exit
15.5 磁盘空间不足 1 2 3 4 5 6 7 8 9 10 11 12 df -hdu -sh /data/gitlab/data/*docker system prune -a find /data/gitlab/data/backups -name "*.tar" -mtime +7 -delete truncate -s 0 /var/lib/docker/containers/*/*-json.log
15.6 权限问题(Permission denied) 现象 :容器启动时报 Permission denied 写日志或数据。
解决 :
1 2 3 4 5 6 7 8 9 10 11 getenforce sudo setenforce 0sudo chown -R 998:998 /data/gitlab/datasudo chown -R 998:998 /data/gitlab/logssudo chown -R 998:998 /data/gitlab/configdocker compose restart
15.7 数据库连接失败 1 2 3 4 5 6 7 8 docker exec -it gitlab gitlab-ctl status postgresql docker exec -it gitlab gitlab-ctl tail postgresql docker exec -it gitlab gitlab-ctl restart postgresql
15.8 邮件发送失败 1 2 3 4 5 6 docker exec -it gitlab gitlab-ctl tail sidekiq docker exec -it gitlab gitlab-rails console Notify.test_email('test@example.com' , 'Test' , 'Body' ).deliver_now
15.9 升级后页面 500 通常是数据库 migration 未完成或缓存问题:
1 2 3 4 5 6 7 8 9 docker exec -it gitlab gitlab-rake db:migrate:status docker exec -it gitlab gitlab-rake db:migrate docker exec -it gitlab gitlab-rake cache:clear docker exec -it gitlab gitlab-ctl restart
十六、安全加固建议 16.1 必做项
16.2 推荐项 1 2 3 4 5 6 7 8 9 10 11 12 13 14 15 16 17 18 19 20 21 22 gitlab_rails['require_two_factor_authentication' ] = true gitlab_rails['two_factor_grace_period' ] = 48 gitlab_rails['password_minimum_length' ] = 12 gitlab_rails['password_complexity_required' ] = true gitlab_rails['session_expire_delay' ] = 1440 gitlab_rails['gravatar_enabled' ] = false gitlab_rails['rack_attack_git_basic_auth' ] = { 'enabled' => true , 'ip_whitelist' => ["127.0.0.1" ], 'maxretry' => 5 , 'findtime' => 60 , 'bantime' => 3600 }
16.3 网络隔离
使用反向代理(Nginx/Traefik)作为唯一入口
GitLab 容器只绑定 127.0.0.1,不直接对外
数据库端口(PostgreSQL 5432、Redis 6379)不要映射到宿主机
十七、卸载与清理 17.1 停止并删除容器 1 2 cd /data/gitlabdocker compose down
17.2 删除数据(不可恢复,谨慎操作 ) 1 2 3 4 5 sudo rm -rf /data/gitlabdocker rmi gitlab/gitlab-ce:18.11.7-ce.0