VitePress的使用
常见的应用场景
我喜欢它的就是文档预览,直接通过markdown变成在线文档。
一、快速开始
安装VitePress
1
2
|
npm install -D vitepress
|
- 执行如上命令之后,会执行如下操作:
- 下载并安装 vitepress 包及其依赖项到项目的 node_modules 目录中。
- 在 package.json 文件中添加 vitepress 到 devDependencies 字段中。
设置向导
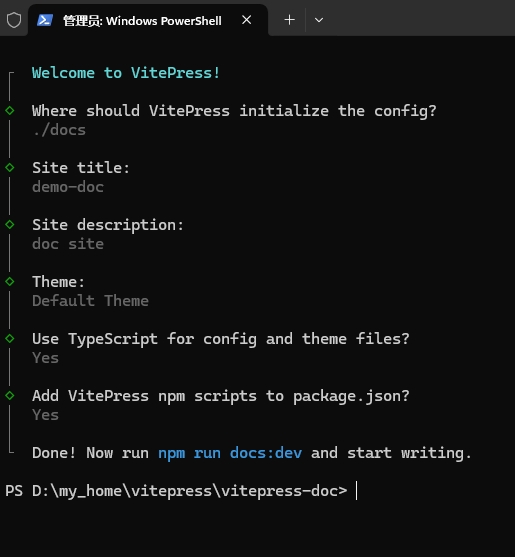
- VitePress 附带一个命令行设置向导,可帮助构建基本项目。
- 安装后,通过运行以下命令启动向导:
npx vitepress init

- 第1个就是设置Vitepress站点的目录,默认是
./就是当前目录,我这里设置的是./docs
- 后面就是设置标题、描述、主题、等等了,直接默认即可
- 之后我们的文档就写到docs目录下配置路由即可
- 使用向导结束之后,就会在
./docs生成一些默认的markdown文件,如:index.md、
- 我们就可以启动预览一下页面
二、配置
1、基本配置
1
2
3
4
5
6
7
| import { defineConfig } from 'vitepress'
export default defineConfig({
title: "文档名称",
titleTemplate: 'rstyro',
description: "文档的基本描述"
})
|
- title: 项目名称,网站的标题,即浏览器标签页上的文本
- titleTemplate: 网页标题的后缀, 就是会在标题后缀拼接,例如:
文档名称 | rstyro
- description: 项目的基本描述用来做SEO优化
社交链接
- 可以在顶部导航的右边中显示带有图标的社交帐户链接,比如Github之类的
1
2
3
4
5
6
7
8
9
10
11
12
13
| import { defineConfig } from 'vitepress'
export default defineConfig({
title: "文档名称",
titleTemplate: 'rstyro',
description: "文档的基本描述",
themeConfig: {
socialLinks: [
{ icon: 'github', link: 'https://github.com/rstyro' }
]
}
})
|
- 支持的图标:
discord、facebook、github、instagram、linkedin、mastodon、slack、twitter、youtube
logo
- 显示在导航栏中网站标题之前的logo文件。
- 接受路径字符串或对象来为亮/暗模式设置不同的logo。
1
2
3
4
5
| export default defineConfig({
themeConfig: {
logo: '/logo.png',
}
})
|
outline
1
2
3
4
5
6
| export default defineConfig({
themeConfig: {
# 类型:number | [number, number] | 'deep' | false
outline: 'deep'
}
})
|
2、head
- 在页面 HTML 的
<head>标记中添加其他元素。
- 比如添加网站的 icon、kewword等等
1
2
3
| export default defineConfig({
head: [['link', { rel: 'icon', href: '/favicon.ico' }]],
})
|
3、导航
- 导航是在页面顶部的导航栏。它包含站点标题、全局菜单链接等。
- 配置 nav字段
1
2
3
4
5
6
7
8
9
| export default defineConfig({
themeConfig: {
nav: [
{ text: 'Home', link: '/' },
{ text: 'Demo', link: '/demo' },
{ text: 'Examples', link: '/markdown-examples' }
]
}
})
|
- text 就是页面现在的导航文本,link 就是对应的跳转链接,
/demo就是对应的demo.md 文件
二级下拉
- 导航支持二级下拉或多级下拉,只需要配置,items 字段即可
- docs下的文件列表如下:
1
2
3
4
5
6
7
8
| .
├─ api-examples.md
├─ markdown-examples.md
├─ index.md
├─ logo.png
└─ demo/
├─ demo1.md
└─ demo2.md
|
1
2
3
4
5
6
7
8
9
10
11
12
13
14
15
16
| export default defineConfig({
themeConfig: {
nav: [
{ text: 'Home', link: '/' },
{
text: 'Demo-Dropdown',
items: [
{ text: 'demo', link: '/demo' },
{ text: 'demo1', link: '/demo/demo1' },
{ text: 'demo2', link: '/demo/demo2' }
]
},
{ text: 'Examples', link: '/markdown-examples' }
]
}
})
|
4、侧边栏
1
2
3
4
5
6
7
8
9
10
11
12
13
14
15
16
17
18
19
20
21
| export default defineConfig({
themeConfig: {
sidebar: [
{
text: 'Examples',collapsed: false,
items: [
{ text: 'Markdown Examples', link: '/markdown-examples' },
{ text: 'Runtime API Examples', link: '/api-examples' }
]
},
{ text: 'Demo', link: '/demo' },
{ text: 'Demo-expend', collapsed: false,
items:[
{ text: 'demo1', link: '/demo1' },
{ text: 'demo2', link: '/demo2' }
]
}
]
}
})
|
- collapsed 可以收缩和展开
- 也是可以多层嵌套,但是最高6层嵌套,超过则忽略
- 和导航栏不同的是,侧边栏可以按页面分为不同的侧边栏
多个侧边栏
1
2
3
4
5
6
7
8
9
10
11
12
13
14
15
16
17
18
19
20
| export default defineConfig({
themeConfig: {
sidebar: {
'/demo/': [
{
text: 'Demo',collapsed: false,
items: [
{ text: 'demo', link: '/demo' },
{ text: 'demo1', link: '/demo/demo1' },
{ text: 'demo2', link: '/demo/demo2' }
]
}
],
}
}
})
|
5、Frontmatter配置
- Frontmatter 支持基于页面的配置。在每个 Markdown 文件中,您可以使用 frontmatter 配置来覆盖站点级或主题级配置选项。
- 在一个Markdown页面中,利用
--- 给出页面的配置信息叫做Frontmatter
- 注意:配置
---必须要放在markdown文件的最顶部
覆盖站点配置
1
2
3
4
5
6
7
8
9
| ---
title: 页面标题修改
titleTemplate: Vite
description: VitePress
outline: deep
---
# 文档内容
### 这里可以继续写内容
|
layout
- 确定页面的布局。
- 可选:doc | home | page
doc - VitePress会将默认的文档样式应用于Markdown内容。home - VitePress为”首页”提供了特殊的布局。您可以添加额外的选项,比如hero和features,以快速创建漂亮的首页。page - 与doc类似,但不对内容应用任何样式。在您想创建完全自定义页面时非常有用。
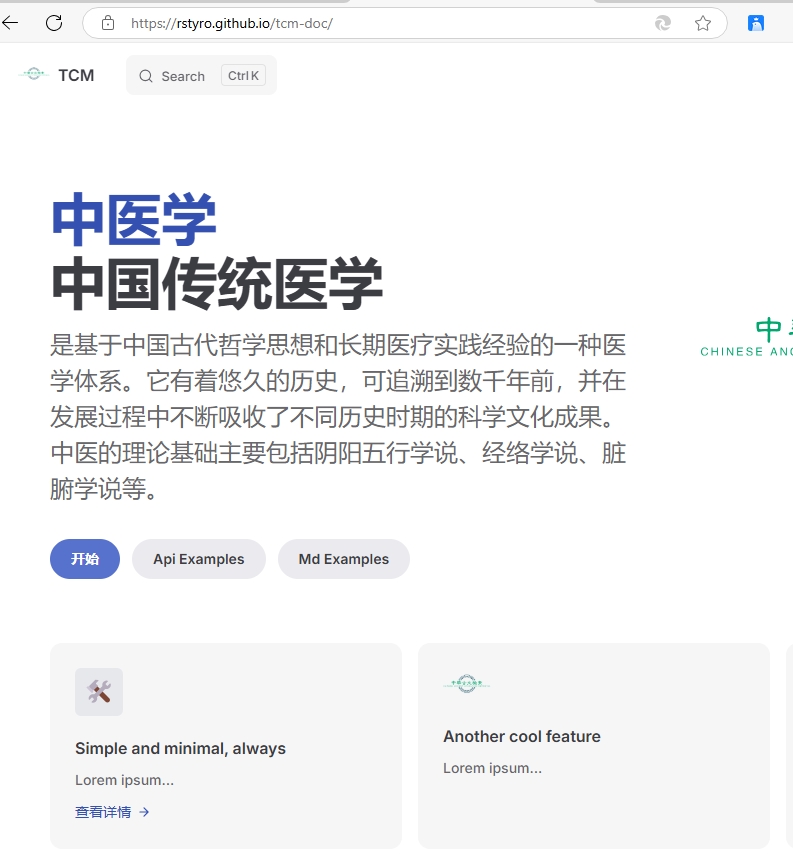
hero与features
1
2
3
4
5
6
7
8
9
10
11
12
13
14
15
16
17
18
19
20
21
22
23
24
25
26
27
28
29
30
31
32
33
34
35
36
37
| ---
layout: home
hero:
name: "demo-doc"
text: "doc site"
tagline: My great project tagline
image:
src: /logo.png
alt: VitePress
actions:
- theme: brand
text: Markdown Examples
link: /markdown-examples
- theme: alt
text: API Examples
link: /api-examples
features:
- icon: 🛠️
title: Simple and minimal, always
details: Lorem ipsum...
link: /demo
linkText: 查看详情
- icon:
src: /static/npx-init.png
title: Another cool feature
details: Lorem ipsum...
- icon:
dark: /logo.png
light: /static/npx-init.png
title: Another cool feature
details: Lorem ipsum...
linkText: 跳转外部链接
link: https:
---
|
- hero.name 一般就是产品名称,带有主题颜色的文本
- hero.text 在 name下面,一般是h1标签的正文内容
- hero.tagline 一般有点像个性签名
- hero.image 主题图片,在产品名称右侧
- features 是配置功能的
- features.icon 可以配置图片
- features.title 标题
- features.details 描述
- features.link 配置链接
- features.linkText 链接的文案
public目录
- 当项目打包之后,会对图片等资源进行hash处理,所以我们在hero与features配置的图片可能会找不到
- VitePress支持一个
public目录,你可以将不想被哈希处理的静态资源放在这个目录中
- 这个public目录在根目录下新建即可,如果你根目录配置的是
./docs那它就是./docs/public
6、页脚
1
2
3
4
5
6
7
8
| export default defineConfig({
themeConfig: {
footer: {
message: 'Released under the MIT License.',
copyright: 'Copyright © 2024-<a href="https://github.com/rstyro">rstyro</a>'
}
}
})
|
7、上/下一页
- 自定义上一页和下一页的文本和链接
- 在markdown文件顶部配置
prev或next,如下:
1
2
3
4
5
6
7
| ---
prev:
text: 'Markdown'
link: '/guide/markdown'
---
# 内容
|
7、本地搜索
- VitePress支持使用浏览器内置索引进行模糊全文搜索
1
2
3
4
5
6
7
| export default defineConfig({
themeConfig: {
search: {
provider: 'local'
}
}
})
|
8、在markdown文件中使用vue指令
1
2
3
4
5
6
7
8
9
10
11
12
13
14
15
16
17
18
| #### Demo的其他内容
<script setup>
import { ref } from 'vue'
import { useData } from 'vitepress'
const { theme } = useData()
const msg = ref('Hello VitePress')
</script>
<h1>{{ msg }}</h1>
<div v-for="item in 8">测试v-for指令{{ item }}</div>
<div>
<h1>{{ theme.footer.copyright }}</h1>
</div>
|
三、部署
1
2
3
4
5
6
7
8
|
npm run docs:dev
npm run docs:build
npm run docs:preview
|
1、部署到Github Pages
- 在Github新建仓库
- 上传代码,然后新建 Actions ,新增工作流,添加文件为
deploy.yml

1
2
3
4
5
6
7
8
9
10
11
12
13
14
15
16
17
18
19
20
21
22
23
24
25
26
27
28
29
30
31
32
33
34
35
36
37
38
39
40
41
42
43
44
45
46
47
48
49
50
51
52
53
54
55
56
57
58
59
60
61
62
63
64
65
66
67
68
69
70
|
name: Deploy VitePress site to Pages
on:
push:
branches: [main]
workflow_dispatch:
permissions:
contents: read
pages: write
id-token: write
concurrency:
group: pages
cancel-in-progress: false
jobs:
build:
runs-on: ubuntu-latest
steps:
- name: Checkout
uses: actions/checkout@v3
with:
fetch-depth: 0
- name: Setup Node
uses: actions/setup-node@v3
with:
node-version: 20
cache: npm
- name: Setup Pages
uses: actions/configure-pages@v3
- name: Install dependencies
run: npm ci
- name: Build with VitePress
run: npm run docs:build
- name: Upload artifact
uses: actions/upload-pages-artifact@v3
with:
path: docs/.vitepress/dist
deploy:
environment:
name: github-pages
url: ${{ steps.deployment.outputs.page_url }}
needs: build
runs-on: ubuntu-latest
name: Deploy
steps:
- name: Deploy to GitHub Pages
id: deployment
uses: actions/deploy-pages@v4
|
- 然后找到”Pages”菜单项,在”Build and deployment > Source”下选择”GitHub Actions”作为构建和部署的源。
- 然后就可以了。Pages设置如下图:


