mhvtl安装使用

一、mhvtl 安装

1、依赖环境安装

  • 依赖安装
# 安装依赖
yum -y install zlib-devel lzo-devel gcc prel kernel-devel

# 安装依赖
yum -y install mtx mt-st lsscsi sysstat sg3_utils git
  • lsscsi 查看SCSI设备信息(必选)
  • mtx 操作带库机械臂(必选)
  • mt-st – 操作带库的驱动(必选)
  • sg3_utilsiscsi-initiator-utils 用于使用 SCSI 命令集的设备的实用程序
  • scsi-target-utils 安装stgt以便将磁带机分配给其他服务器上的备份软件使用

开启iSCSI服务:

# centos6
service tgtd start

# centos7,服务相关命令
systemctl start tgtd
systemctl restart tgtd
systemctl stop tgtd
  • sysstat Linux系统管理工具包(可选)

2、下载mhvtl源码

  • 进入到如上图的目录后,执行命令编译安装:
# 根据内核,安装对应的内核开发工具,如果对应的内核没安装成功,可能会导致后面的步骤安装失败
yum -y install kernel-devel-$(uname -r) kernel-headers-$(uname -r)

# 进入 kernel 目录,安装内核
cd ./kernel/
make && make install

# 向内核中加载mhvtl模块
modprobe mhvtl
lsmod |grep mhvtl

# 返回上一级
cd ..
# 开始编译安装mhvtl
make && make install
  • 安装成功后,即可启动服务
# 把mhvtl加入开机自启动计划
systemctl enable mhvtl.target
# 状态
systemctl status mhvtl.target

# 启动mhvtl服务
systemctl start mhvtl.target

# 停止服务
systemctl stop mhvtl.target

二、mhVTL的使用

  • 简单命令使用

1、查看磁带库设备相关信息

  • 命令: lsscsi -g


    # 结果如下:
    [root@localhost dcs-ods-nvtl]# lsscsi -g
    [0:0:0:0] disk VMware Virtual disk 2.0 /dev/sda /dev/sg0
    [3:0:0:0] cd/dvd NECVMWar VMware SATA CD00 1.00 /dev/sr0 /dev/sg1
    [33:0:0:0] mediumx STK L700 0106 /dev/sch1 /dev/sg6
    [33:0:1:0] tape IBM ULT3580-TD5 0106 /dev/st5 /dev/sg9
    [33:0:2:0] tape IBM ULT3580-TD5 0106 /dev/st4 /dev/sg8
    [33:0:3:0] tape IBM ULT3580-TD4 0106 /dev/st2 /dev/sg5
    [33:0:4:0] tape IBM ULT3580-TD4 0106 /dev/st1 /dev/sg4
    [33:0:8:0] mediumx STK L80 0106 /dev/sch0 /dev/sg2
    [33:0:9:0] tape STK T10000B 0106 /dev/st3 /dev/sg7
    [33:0:10:0] tape STK T10000B 0106 /dev/st0 /dev/sg3
    [33:0:11:0] tape STK T10000B 0106 /dev/st7 /dev/sg11
    [33:0:12:0] tape STK T10000B 0106 /dev/st6 /dev/sg10


    # 返回值解析
    # 第1列:SCSI设备id:host, channel,id,lun。
    # 第2列:设备类型。
    # 第3,4,5列:设备厂商,型号,版本信息。
    # 第6列:设备主节点名。
    # 最后一列: sg设备名
  • 类型为:mediumx 为两个磁带机(机械手),例: /dev/sg6/dev/sg2

    • 其中/dev/st5/dev/st4/dev/st2/dev/st1 分别表示·/dev/sg6的磁带驱动器,刚好对应从0索引开始
    • 同理可知 /dev/st3/dev/st0/dev/st7/dev/st6 分别表示·/dev/sg2的磁带驱动器,刚好对应从0索引开始
  • 类型为:tape的就是磁带驱动器,8个驱动器

  • lsscsi 命令参数含义:
-g	显示SCSI通用设备文件名称
-k 显示内核名称而不是设备节点名
-d 显示设备节点的主要号码和次要号码
-H 列出当前连接到系统的SCSI主机而不是SCSI设备
-l 显示每一个SCSI设备(主机)的附加信息
-c 相对于执行cat /proc/scsi/scsi命令的输出
-p 显示额外的数据完整性(保护)的信息
-t 显示传输信息
-L 以“属性名=值”的方式显示附加信息
-v 显示设备属性所在目录,当信息找到时输出目录名
-y<路径> 假设sysfs挂载在指定路径而不是默认的“/ sys”
-s 显示容量大小。
-x 以16进制显示lun号。
-i 显示udev相关的属性
-w 显示WWN

2、磁带相关命令

  • 磁带的相关命令
①、查看机械手状态
# 查看机械手状态: mtx -f /dev/sg6 status
# 如下示例:
[root@localhost dcs-ods-nvtl]# mtx -f /dev/sg6 status
Storage Changer /dev/sg6:4 Drives, 43 Slots ( 4 Import/Export )
# 4个驱动器
Data Transfer Element 0:Empty
Data Transfer Element 1:Empty
Data Transfer Element 2:Empty
Data Transfer Element 3:Empty
# 43个磁带槽
Storage Element 1:Full :VolumeTag=E01001L4
Storage Element 2:Full :VolumeTag=E01002L4
Storage Element 3:Full :VolumeTag=E01003L4
Storage Element 4:Full :VolumeTag=E01004L4
Storage Element 5:Full :VolumeTag=E01005L4
...
Storage Element 39:Full :VolumeTag=F01039L5
Storage Element 40 IMPORT/EXPORT:Empty
Storage Element 41 IMPORT/EXPORT:Empty
Storage Element 42 IMPORT/EXPORT:Empty
Storage Element 43 IMPORT/EXPORT:Empty
②、加载与卸载磁带
  • 如下
# 装载磁带命令格式:mtx -f <机械手设备号> load <slots> <drive>
# 把1 号插槽的磁带,放入0号驱动器中
[root@localhost dcs-ods-nvtl]# mtx -f /dev/sg6 load 1 0
Loading media from Storage Element 1 into drive 0...done
[root@localhost dcs-ods-nvtl]#

# 卸载磁带命令格式:mtx -f <机械手设备号> unload <slots> <drive>
# 把0号驱动器中磁带,放入1号插槽中
[root@localhost dcs-ods-nvtl]# mtx -f /dev/sg6 unload 1 0
Unloading drive 0 into Storage Element 1...done
[root@localhost dcs-ods-nvtl]#

# 查看驱动器装载磁带的状态
[root@localhost dcs-ods-nvtl]# sg_turs /dev/st0
device not ready
[root@localhost dcs-ods-nvtl]#

# 列出磁带机状态:
# mt -f /dev/st0 status
[root@localhost dcs-ods-nvtl]# mt -f /dev/st0 status
SCSI 2 tape drive:
File number=0, block number=0, partition=0.
Tape block size 0 bytes. Density code 0x4a (no translation).
Soft error count since last status=0
General status bits on (41010000):
BOT ONLINE IM_REP_EN
# BOT ONLINE IM_REP_EN //磁带准备就绪,说明已加载磁带
# DR_OPEN IM_REP_EN //磁带门打开,磁带未准备好,说明磁带驱动器里面没加载磁带,对应加载磁带即可
③、磁带数据读写命令
  • 可以使用tar命令
# 向驱动器读数据,假如磁带上没有任何文件,则列目录会报错,忽略即可。
# tar -tvf /dev/st2
[root@localhost dcs-ods-nvtl]# tar -tvf /dev/st2
drwxr-xr-x root/root 0 2021-09-13 18:05 mhvtl/test_data/
-rw-r--r-- root/root 15 2021-09-13 17:57 mhvtl/test_data/a.txt
-rw-r--r-- root/root 15 2021-09-13 18:00 mhvtl/test_data/b.txt
-rw-r--r-- root/root 15 2021-09-13 18:05 mhvtl/test_data/c.txt
[root@localhost dcs-ods-nvtl]#


# 写入数据操作,每次写入都会覆盖之前的文件。
# tar cvf /dev/st0 <要写入的文件名>
[root@localhost dcs-ods-nvtl]# tar -cvf /dev/st2 /mhvtl/test_data/
tar: 从成员名中删除开头的“/”
/mhvtl/test_data/
/mhvtl/test_data/a.txt
/mhvtl/test_data/b.txt
/mhvtl/test_data/c.txt
[root@localhost dcs-ods-nvtl]#

# 继续写入数据,不覆盖之前文件,tar cvf 会覆盖之前写入的文件
# tar rvf /dev/st0 <要写入的文件名>
[root@localhost dcs-ods-nvtl]# tar -rvf /dev/st2 /mhvtl/test_data/d.txt
tar: 从成员名中删除开头的“/”
/mhvtl/test_data/d.txt
[root@localhost dcs-ods-nvtl]#


# 恢复目录(tar 格式)
# tar xvf /dev/st0 -C /tmp
[root@localhost dcs-ods-nvtl]# tar xvf /dev/st2 -C /mhvtl/recover
mhvtl/test_data/
mhvtl/test_data/a.txt
mhvtl/test_data/b.txt
mhvtl/test_data/c.txt
mhvtl/test_data/d.txt
[root@localhost dcs-ods-nvtl]# ll /mhvtl/recover/
总用量 0
drwxr-xr-x. 3 root root 23 9月 13 18:48 mhvtl
[root@localhost dcs-ods-nvtl]#


# 读取数据到当前目录
# tar xvf /dev/st0 <要读取的文件名>
[root@localhost dcs-ods-nvtl]# tar -xvf /dev/st2 mhvtl/test_data/a.txt
mhvtl/test_data/a.txt
[root@localhost dcs-ods-nvtl]#


# 检查磁头是否位置磁带的起始位置  
[root@localhost dcs-ods-nvtl]# mt -f /dev/st0 tell
At block 0.
[root@localhost dcs-ods-nvtl]#
④、其他常用命令
  • 如下
# 移动磁带,从 8 插槽移动到2插槽
[root@localhost ~]# mtx -f /dev/sg6 transfer 8 2
[root@localhost ~]#

# 倒带,将磁带卷至起始位置:
[root@localhost dcs-ods-nvtl]# mt -f /dev/st0 rewind
[root@localhost dcs-ods-nvtl]#

# 擦除,擦掉磁带上的内容,如果是真实磁带,对磁带损伤比较大,一般不用。
[root@localhost dcs-ods-nvtl]# mt -f /dev/st0 erase
[root@localhost dcs-ods-nvtl]#

# 出带,将磁带卷至初始位置然后从磁带机内弹出
[root@localhost dcs-ods-nvtl]# mt -f /dev/st0 offline
[root@localhost dcs-ods-nvtl]#

# 张紧磁带盒如果磁带在读取时发生错误,你重新张紧磁带,清洁磁带驱动器,像下面这样再试一次
[root@localhost dcs-ods-nvtl]# mt -f /dev/st0 retension
[root@localhost dcs-ods-nvtl]#

# 磁带前进n个文件
mt -f /dev/nst0 fsf n

# 磁带后退n个文件
mt -f /dev/nst0 bsf n

# 查看带的信息
tapeinfo -f /dev/st0

3、vtlcmd命令使用

  • 来看看文档先
Usage  : vtlcmd <DeviceNo> <command> [-h|-help]
Version: 1.6.3

Where 'DeviceNo' is the number associated with tape/library daemon

Global commands:
verbose -> To enable verbose logging
TapeAlert # -> 64bit TapeAlert mask (hex)
exit -> To shutdown tape/library daemon/device

Tape specific commands:
Append Only [Yes|No] -> To 'load' media ID
compression [zlib|lzo] -> Use zlib or lzo compression
load ID -> To 'load' media ID
unload ID -> To 'unload' media ID
delay load n -> Set load delay to n seconds
delay unload n -> Set unload delay to n seconds
delay rewind n -> Set rewind delay to n seconds
delay position n -> Set position delay to n seconds
delay thread n -> Set thread delay to n seconds

Library specific commands:
add slot -> Add a slot to library
online -> To enable library
offline -> To take library offline
list map -> To list map contents
empty map -> To remove media from map
open map -> Open map to allow media export
close map -> Close map to allow media import
load map ID -> Load media ID into map
① 、map命令的使用
  • map 命令主要是把磁带放入磁带机或从磁带机拿走
  • 命令格式:vtlcmd <DeviceNo> <command>
# 列出可以操作的磁带
vtlcmd 30 list map

# 从磁带机中拿走磁带
# 先打开map,才能拿出磁带
vtlcmd 30 open map
# 拿出 map 槽中的所有磁带
vtlcmd 30 empty map

# 把数据磁带放入磁带机中,F00001是磁带的唯一条形码
vtlcmd 30 load map F00001
# 关上map,然后就可以移动磁带到插槽中
vtlcmd 30 close map
②、创建磁带
  • 可以使用mktape,文档如下:
Usage: mktape [OPTIONS] [REQUIRED-PARAMS]Where OPTIONS are from:
-h -- print this message and exit
-v -- verbose
-D[N] -- set debug level to N [1]
-V -- print Version and exit
-C config-dir -- override default config dir [ /etc/mhvtl ]
-H home-dir -- override default home dir [ /opt/mhvtl ]
And REQUIRED-PARAMS are:
-l lib -- set Library number
-m PCL -- set Physical Cartrige Label (barcode)
-s size -- set size in Megabytes
-t type -- set to data, clean, WORM, or NULL
-d density -- set density to one of:
AIT1 AIT2 AIT3 AIT4
DDS1 DDS2 DDS3 DDS4
DLT3 DLT4
SDLT1 SDLT220 SDLT320 SDLT600
LTO1 LTO2 LTO3 LTO4
LTO5 LTO6 LTO7 LTO8
T10KA T10KB T10KC
9840A 9840B 9840C 9840D
9940A 9940B
J1A E05 E06 E07
  • 示例如下:
# -l 是虚拟带库的ID,-m 是条形码,-s 是磁带容量,-t是磁带存储类型,-d 是磁带型号 
mktape -l 71 -m F00001 -s 2048 -t data -d 9940A

三、ISCSI相关

简介

  • iSCSI 这个架构主要将储存装置与使用的主机分为两个部分,分别是:
  • iSCSI target:就是储存设备端,存放磁盘或 RAID 的设备,目前也能够将 Linux 主机仿真成 iSCSI target 了!目的在提供其他主机使用的『磁盘』
  • iSCSI initiator:就是能够使用 target 的客户端,通常是服务器。 也就是说,想要连接到 iSCSI target 的服务器,也必须要安装 iSCSI initiator 的相关功能后才能够使用 iSCSI target 提供的磁盘就是了

所需软件与软件结构

CentOS 将 tgt 的软件名称定义为scsi-target-utils ,因此你得要使用 yum 去安装他才行。至于用来作为 initiator 的软件则是使用 linux-iscsi 的项目,该项目所提供的软件名称则为iscsi-initiator-utils 。所以,总的来说,你需要的软件有:

  • scsi-target-utils:用来将 Linux 系统仿真成为 iSCSI target 的功能;
  • iscsi-initiator-utils:挂载来自 target 的磁盘到 Linux 本机上。

那么 scsi-target-utils 主要提供哪些档案呢?基本上有底下几个比较重要需要注意的:

  • /etc/tgt/targets.conf:主要配置文件,设定要分享的磁盘格式与哪几颗;
  • /usr/sbin/tgt-admin:在线查询、删除 target 等功能的设定工具;
  • /usr/sbin/tgt-setup-lun:建立 target 以及设定分享的磁盘与可使用的

客户端等工具软件。

  • /usr/sbin/tgtadm:手动直接管理的管理员工具 (可使用配置文件取代);
  • /usr/sbin/tgtd:主要提供 iSCSI target 服务的主程序;
  • /usr/sbin/tgtimg:建置预计分享的映像文件装置的工具 (以映像文件仿真磁盘);

其实 CentOS 已经将很多功能都设定好了,因此我们只要修订配置文件,然后启动 tgtd 这个服务就可以了! 接下来,就让我们实际来玩一玩 iSCSI target 的设定吧!

1、target端

# 目标端,服务端
yum -y install scsi-target-utils

# 创建磁盘
dd if=/dev/zero of=/dcs/iscsi_disks/disk01.img count=0 bs=1 seek=1G

# 授权
chcon -Rv -t tgtd_var_lib_t /dcs/iscsi_disks/

# 修改配置文件
vim /etc/tgt/targets.conf
# 添加如下
<target iqn.20210910.com.dcs:imgtgt.targrt0>
backing-store /dcs/iscsi_disks/disk01.img
initiator-address 192.168.1.0/24
</target>


# 重启
systemctl restart tgtd
  • 或者直接使用磁带相关,如下:
# 查看磁带库设备相关信息
[root@localhost dcs-ods-nvtl]# lsscsi -g
[0:0:0:0] disk VMware Virtual disk 2.0 /dev/sda /dev/sg0
[3:0:0:0] cd/dvd NECVMWar VMware SATA CD00 1.00 /dev/sr0 /dev/sg1
[33:0:0:0] mediumx STK L700 0106 /dev/sch0 /dev/sg10
[33:0:1:0] tape IBM ULT3580-TD5 0106 /dev/st0 /dev/sg2
[33:0:2:0] tape IBM ULT3580-TD5 0106 /dev/st7 /dev/sg9
[33:0:3:0] tape IBM ULT3580-TD4 0106 /dev/st4 /dev/sg6
[33:0:4:0] tape IBM ULT3580-TD4 0106 /dev/st2 /dev/sg4
[33:0:8:0] mediumx STK L80 0106 /dev/sch1 /dev/sg11
[33:0:9:0] tape STK T10000B 0106 /dev/st3 /dev/sg5
[33:0:10:0] tape STK T10000B 0106 /dev/st6 /dev/sg8
[33:0:11:0] tape STK T10000B 0106 /dev/st1 /dev/sg3
[33:0:12:0] tape STK T10000B 0106 /dev/st5 /dev/sg7
[root@localhost dcs-ods-nvtl]#


# 然后修改tgtd的配置文件
vim /etc/tgt/targets.conf
# 添加如下

<target iqn.2021-09.14.com.dcs.tape>
backing-store /dev/sg0
backing-store /dev/sg1
backing-store /dev/sg10
backing-store /dev/sg2
backing-store /dev/sg9
backing-store /dev/sg6
backing-store /dev/sg4
backing-store /dev/sg11
backing-store /dev/sg5
backing-store /dev/sg8
backing-store /dev/sg3
backing-store /dev/sg7
device-type pt
bs-type sg
</target>

# 重启
systemctl restart tgtd

# 查看
[root@localhost dcs-ods-nvtl]# tgtadm --lld iscsi --op show --mode target
Target 1: iqn.2021-09.14.com.dcs.tape
System information:
Driver: iscsi
State: ready
I_T nexus information:
I_T nexus: 1
Initiator: iqn.1991-05.com.microsoft:desktop-uqqtbl0 alias: none
Connection: 1
IP Address: 192.168.1.51
LUN information:
LUN: 0
Type: controller
SCSI ID: IET 00010000
SCSI SN: beaf10
Size: 0 MB, Block size: 1
Online: Yes
Removable media: No
Prevent removal: No
Readonly: No
SWP: No
Thin-provisioning: No
Backing store type: null
Backing store path: None
Backing store flags:
LUN: 1
Type: passthrough
SCSI ID: IET 00010001
SCSI SN: beaf11
Size: 0 MB, Block size: 1
Online: Yes
Removable media: No
Prevent removal: No
Readonly: No
SWP: No
Thin-provisioning: No
Backing store type: sg
Backing store path: /dev/sg0
Backing store flags:
LUN: 2
Type: passthrough
SCSI ID: IET 00010002
SCSI SN: beaf12
Size: 0 MB, Block size: 1
Online: Yes
Removable media: No
Prevent removal: No
Readonly: No
SWP: No
Thin-provisioning: No
Backing store type: sg
Backing store path: /dev/sg1
Backing store flags:
LUN: 3
Type: passthrough
SCSI ID: IET 00010003
SCSI SN: beaf13
Size: 0 MB, Block size: 1
Online: Yes
Removable media: No
Prevent removal: No
Readonly: No
SWP: No
Thin-provisioning: No
Backing store type: sg
Backing store path: /dev/sg10
Backing store flags:
LUN: 4
Type: passthrough
SCSI ID: IET 00010004
SCSI SN: beaf14
Size: 0 MB, Block size: 1
Online: Yes
Removable media: No
Prevent removal: No
Readonly: No
SWP: No
Thin-provisioning: No
Backing store type: sg
Backing store path: /dev/sg11
Backing store flags:
LUN: 5
Type: passthrough
SCSI ID: IET 00010005
SCSI SN: beaf15
Size: 0 MB, Block size: 1
Online: Yes
Removable media: No
Prevent removal: No
Readonly: No
SWP: No
Thin-provisioning: No
Backing store type: sg
Backing store path: /dev/sg2
Backing store flags:
LUN: 6
Type: passthrough
SCSI ID: IET 00010006
SCSI SN: beaf16
Size: 0 MB, Block size: 1
Online: Yes
Removable media: No
Prevent removal: No
Readonly: No
SWP: No
Thin-provisioning: No
Backing store type: sg
Backing store path: /dev/sg3
Backing store flags:
LUN: 7
Type: passthrough
SCSI ID: IET 00010007
SCSI SN: beaf17
Size: 0 MB, Block size: 1
Online: Yes
Removable media: No
Prevent removal: No
Readonly: No
SWP: No
Thin-provisioning: No
Backing store type: sg
Backing store path: /dev/sg4
Backing store flags:
LUN: 8
Type: passthrough
SCSI ID: IET 00010008
SCSI SN: beaf18
Size: 0 MB, Block size: 1
Online: Yes
Removable media: No
Prevent removal: No
Readonly: No
SWP: No
Thin-provisioning: No
Backing store type: sg
Backing store path: /dev/sg5
Backing store flags:
LUN: 9
Type: passthrough
SCSI ID: IET 00010009
SCSI SN: beaf19
Size: 0 MB, Block size: 1
Online: Yes
Removable media: No
Prevent removal: No
Readonly: No
SWP: No
Thin-provisioning: No
Backing store type: sg
Backing store path: /dev/sg6
Backing store flags:
LUN: 10
Type: passthrough
SCSI ID: IET 0001000a
SCSI SN: beaf110
Size: 0 MB, Block size: 1
Online: Yes
Removable media: No
Prevent removal: No
Readonly: No
SWP: No
Thin-provisioning: No
Backing store type: sg
Backing store path: /dev/sg7
Backing store flags:
LUN: 11
Type: passthrough
SCSI ID: IET 0001000b
SCSI SN: beaf111
Size: 0 MB, Block size: 1
Online: Yes
Removable media: No
Prevent removal: No
Readonly: No
SWP: No
Thin-provisioning: No
Backing store type: sg
Backing store path: /dev/sg8
Backing store flags:
LUN: 12
Type: passthrough
SCSI ID: IET 0001000c
SCSI SN: beaf112
Size: 0 MB, Block size: 1
Online: Yes
Removable media: No
Prevent removal: No
Readonly: No
SWP: No
Thin-provisioning: No
Backing store type: sg
Backing store path: /dev/sg9
Backing store flags:
Account information:
ACL information:
ALL
[root@localhost dcs-ods-nvtl]#
  • 还有用命令的方式:
# 将机械臂和驱动器通过ISCSI的方式映射出去
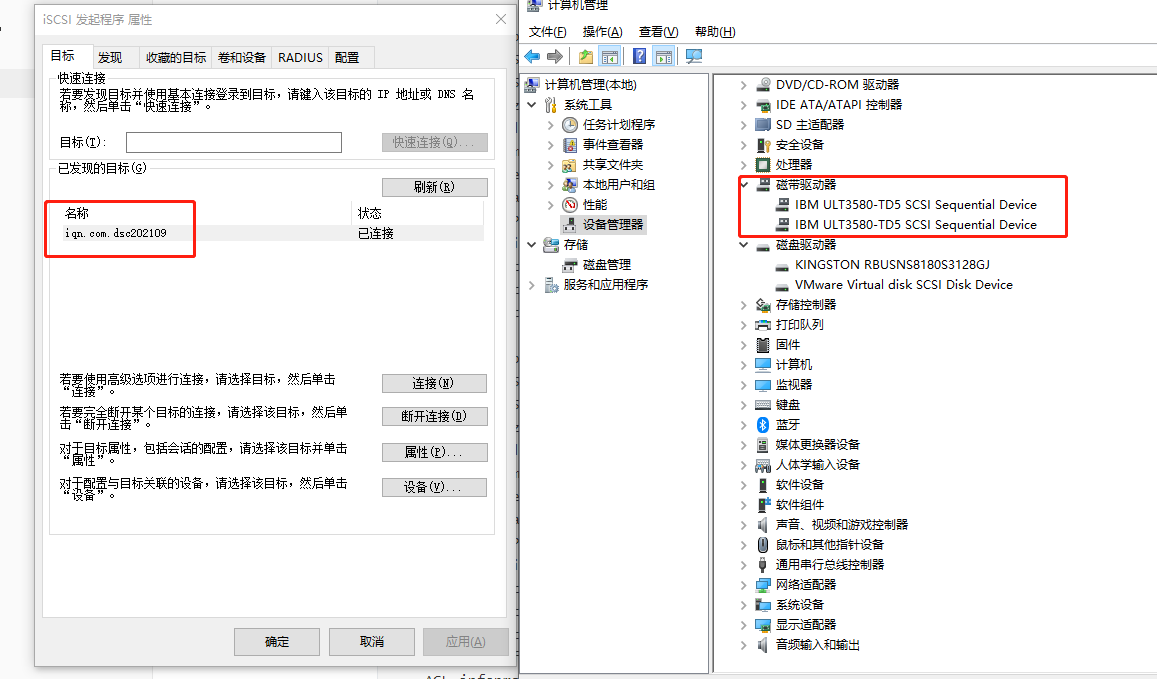
# 创建一个target ,iqn.com.dsc202109 自定义一个名字即可.
[root@localhos mhvtl]#tgtadm --lld iscsi --op new --mode target --tid 1 -T iqn.com.dsc202109
# 为id=1的target设备上添加一个新的LUN,其号码为1。lun0已经被系统预留。
[root@localhost mhvtl]#tgtadm --lld iscsi --op new --mode logicalunit --tid 1 --lun 1 --bstype=sg --device-type=pt -b /dev/sg0
[root@localhost mhvtl]#tgtadm --lld iscsi --op new --mode logicalunit --tid 1 --lun 2 --bstype=sg --device-type=pt -b /dev/sg1
[root@localhost mhvtl]#tgtadm --lld iscsi --op new --mode logicalunit --tid 1 --lun 3 --bstype=sg --device-type=pt -b /dev/sg10
[root@localhost mhvtl]#tgtadm --lld iscsi --op new --mode logicalunit --tid 1 --lun 4 --bstype=sg --device-type=pt -b /dev/sg2
[root@localhost mhvtl]#tgtadm --lld iscsi --op new --mode logicalunit --tid 1 --lun 5 --bstype=sg --device-type=pt -b /dev/sg9
# 192.168.1.0为安装VTL软件的网段设置targets访问控制策略,允许同一网段访问
[root@localhost mhvtl]# tgtadm --lld iscsi --op bind --mode target --tid 1 -I 192.168.1.0/24


# 显示所有 target
[root@localhost mhvtl]# tgtadm --lld iscsi --op show --mode target
Target 1: iqn.com.dsc202109
System information:
Driver: iscsi
State: ready
I_T nexus information:
I_T nexus: 1
Initiator: iqn.1991-05.com.microsoft:desktop-uqqtbl0 alias: none
Connection: 1
IP Address: 192.168.1.51
LUN information:
LUN: 0
Type: controller
SCSI ID: IET 00010000
SCSI SN: beaf10
Size: 0 MB, Block size: 1
Online: Yes
Removable media: No
Prevent removal: No
Readonly: No
SWP: No
Thin-provisioning: No
Backing store type: null
Backing store path: None
Backing store flags:
LUN: 1
Type: passthrough
SCSI ID: IET 00010001
SCSI SN: beaf11
Size: 0 MB, Block size: 1
Online: Yes
Removable media: No
Prevent removal: No
Readonly: No
SWP: No
Thin-provisioning: No
Backing store type: sg
Backing store path: /dev/sg0
Backing store flags:
LUN: 2
Type: passthrough
SCSI ID: IET 00010002
SCSI SN: beaf12
Size: 0 MB, Block size: 1
Online: Yes
Removable media: No
Prevent removal: No
Readonly: No
SWP: No
Thin-provisioning: No
Backing store type: sg
Backing store path: /dev/sg1
Backing store flags:
LUN: 3
Type: passthrough
SCSI ID: IET 00010003
SCSI SN: beaf13
Size: 0 MB, Block size: 1
Online: Yes
Removable media: No
Prevent removal: No
Readonly: No
SWP: No
Thin-provisioning: No
Backing store type: sg
Backing store path: /dev/sg10
Backing store flags:
LUN: 4
Type: passthrough
SCSI ID: IET 00010004
SCSI SN: beaf14
Size: 0 MB, Block size: 1
Online: Yes
Removable media: No
Prevent removal: No
Readonly: No
SWP: No
Thin-provisioning: No
Backing store type: sg
Backing store path: /dev/sg2
Backing store flags:
LUN: 5
Type: passthrough
SCSI ID: IET 00010005
SCSI SN: beaf15
Size: 0 MB, Block size: 1
Online: Yes
Removable media: No
Prevent removal: No
Readonly: No
SWP: No
Thin-provisioning: No
Backing store type: sg
Backing store path: /dev/sg9
Backing store flags:
Account information:
ACL information:
192.168.1.0/24

2、iscsi客户端相关命令

  • 简单命令
# 服务发现
iscsiadm -m discovery -t st -p 192.168.1.160

# 登陆
iscsiadm -m node -T iqn.test-iSCSI-0 -l
iscsiadm -m node -T iqn.test-iSCSI-0 -p 192.168.1.160 -l
iscsiadm -m node -T iqn.test-iSCSI-0 -p 192.168.1.160:3260 -l

# 注销
iscsiadm -m node -T iqn.test-iSCSI-0 -p 192.168.1.160:3260 –u
# 退出所有登陆的目标器
iscsiadm -m node -U all


# 连接死掉(断网或者target端断掉)时,使用如下指令:
iscsiadm -m node -o delete –T iqn.test-iSCSI-0 -p 192.168.1.160

# 查看目标记录列表
iscsiadm -m node

#命令刷新(rescan)已连接
-------------本文结束 感谢您的阅读-------------