一、版本说明
我觉得有必要介绍Spring-cloud-alibaba与Springcloud的版本关系。
1、毕业版本依赖关系
| SpringCloud Version |
SpringCloud-Alibaba version |
SpringBoot Version |
| Spring Cloud Hoxton.SR8 |
2.2.3.RELEASE |
2.3.2.RELEASE |
| Spring Cloud Greenwich.SR6 |
2.1.3.RELEASE |
2.1.13.RELEASE |
| Spring Cloud Hoxton.SR8 |
2.2.2.RELEASE |
2.3.2.RELEASE |
| Spring Cloud Hoxton.SR3 |
2.2.1.RELEASE |
2.2.5.RELEASE |
| Spring Cloud Hoxton.RELEASE |
2.2.0.RELEASE |
2.2.X.RELEASE |
| Spring Cloud Greenwich |
2.1.2.RELEASE |
2.1.X.RELEASE |
| Spring Cloud Finchley |
2.0.3.RELEASE |
2.0.X.RELEASE |
| Spring Cloud Edgware |
1.5.1.RELEASE(停止维护,建议升级) |
1.5.X.RELEASE |
2、孵化版本依赖关系(不推荐使用)
| SpringCloud Version |
SpringCloud-Alibaba version |
SpringBoot Version |
| Spring Cloud Greenwich |
0.9.0.RELEASE |
2.1.X.RELEASE |
| Spring Cloud Finchley |
0.2.X.RELEASE |
2.0.X.RELEASE |
| Spring Cloud Edgware |
0.1.X.RELEASE |
1.5.X.RELEASE |
孵化版本肯定是不推荐使用的,但是网上很多资料都是以孵化版本来讲的。
二、Nacos服务注册与发现
本文的SpringCloud-Alibaba版本是:2.2.3.RELEASE 算是写本文的最新版本。
1、启动Nacos
Nanos的安装与使用,上篇讲过了。
2、引入依赖
再pom.xml中添加依赖springcloud-alibaba的主版本。
1
2
3
4
5
6
7
8
9
10
11
| <dependencyManagement>
<dependencies>
<dependency>
<groupId>com.alibaba.cloud</groupId>
<artifactId>spring-cloud-alibaba-dependencies</artifactId>
<version>2.2.3.RELEASE</version>
<type>pom</type>
<scope>import</scope>
</dependency>
</dependencies>
</dependencyManagement>
|
然后再引入 nacos服务发现依赖:
1
2
3
4
| <dependency>
<groupId>com.alibaba.cloud</groupId>
<artifactId>spring-cloud-starter-alibaba-nacos-discovery</artifactId>
</dependency>
|
也就说引入两个依赖,即可实现Nacos的服务发现。如果需要注册服务,如:在Springboot的启动来上使用注解:@EnableDiscoveryClient即可。
为了更直观的看到效果,我们创建一个消费者和生产者的项目来测试。
三、创建消费者和生产者
提供者和消费者的代码都是一个SpringBoot 应用。
1、生产者
生产者也就是服务的提供者。
第一步
新建一个SpringBoot项目,在生成Springboot依赖的基础上,在加入依赖:
1
2
3
4
5
6
7
8
9
10
11
12
13
14
15
16
| <dependencyManagement>
<dependencies>
<dependency>
<groupId>com.alibaba.cloud</groupId>
<artifactId>spring-cloud-alibaba-dependencies</artifactId>
<version>2.2.3.RELEASE</version>
<type>pom</type>
<scope>import</scope>
</dependency>
</dependencies>
</dependencyManagement>
<dependency>
	<groupId>com.alibaba.cloud</groupId>
	<artifactId>spring-cloud-starter-alibaba-nacos-discovery</artifactId>
</dependency>
|
第二步
配置nacos的配置,在application.yml添加
1
2
3
4
5
6
7
8
9
| spring:
profiles:
active: dev
application:
name: nacos-provider
cloud:
nacos:
discovery:
server-addr: 127.0.0.1:8848
|
上面一个是配置nacos 地址,还有配置生产者的服务名称为:nacos-provider。
第三步
想Nacos注册服务,在启动类ProviderApplication上添加注解@EnableDiscoveryClient。
1
2
3
4
5
6
7
| @EnableDiscoveryClient
@SpringBootApplication
public class ProviderApplication {
public static void main(String[] args) {
SpringApplication.run(ProviderApplication.class, args);
}
}
|
第四步
创建一个controller,并添加一个接口
1
2
3
4
5
6
7
8
9
10
11
12
| @RequestMapping("/test")
@RestController
public class TestController {
@GetMapping("/sayHi")
public String sayHi(String name){
String result = "hello ";
result = result.concat(name);
System.out.println(result);
return result;
}
}
|
重要内容都标出来了。查询所有代码内容底下有Github地址。
2、消费者
- 1、消费者的代码前3步和上面的生产者是一样的
- 2、记得修改消费者的服务名称:
spring.application.name=nacos-consumer,这个和provider不一样就可以了。
- 3、然后第四步不一样是因为我们要去请求(调用或者说访问)生产者(provider)。访问的方式有很多种,下面介绍几种常用的。
2.1、Feign调用
首先需要添加其依赖:
1
2
3
4
5
| <dependency>
<groupId>org.springframework.cloud</groupId>
<artifactId>spring-cloud-starter-openfeign</artifactId>
<version>2.2.3.RELEASE</version>
</dependency>
|
feign 调用应该是挺常用的吧,创建一个feign客户端:NacosProviderFeignClient(名字随便取)。
1
2
3
4
5
6
7
| @FeignClient("nacos-provider")
public interface NacosProviderFeignClient {
@GetMapping("/test/sayHi")
// @RequestParam 用于参数映射不然会报: [405] 异常
String sayHi(@RequestParam("name") String name);
}
|
然后再Controller进行调用
1
2
3
4
5
6
7
8
9
10
11
12
13
14
15
16
| /**
* feign调用
*/
@RequestMapping("/feign")
@RestController
public class FeignController {
@Autowired
NacosProviderFeignClient nacosProviderFeignClient;
@GetMapping("/hello")
public String hello(String name){
String result = nacosProviderFeignClient.sayHi(name);
return "feign访问provider返回 : " + result;
}
}
|
2.2、RestTemplate调用
spring提供了一种简单便捷的模板类来进行操作,这就是RestTemplate。
1
2
3
4
5
6
7
8
9
10
11
12
13
14
15
16
17
18
19
| @RequestMapping("/rest")
@RestController
public class RestTemplateController {
@Autowired
RestTemplate loadRestTemplate;
@GetMapping("/hello")
public String hello(String name){
String result = loadRestTemplate.getForObject("http://nacos-provider/test/sayHi?name="+name, String.class);
return "访问provider 返回 : " + result;
}
@Bean
@LoadBalanced
public RestTemplate loadRestTemplate(){
return new RestTemplate();
}
}
|
使用@LoadBalanced使他具有负载均衡的作用,可以看看LoadBalancerAutoConfiguration,有个restTemplateCustomizer()定制器,在其中加入了负载均衡拦截器LoadBalancerInterceptor。在其中调用的是:LoadBalancerClient 接口.这个下面会讲。最终调用的还是Ribbon的实现类。
2.3、Ribbon调用
这种是直接使用LoadBalancerClient 调用。
1
2
3
4
5
6
7
8
9
10
11
12
13
14
15
16
17
18
19
| @RequestMapping("/ribbon")
@RestController
public class RibbonController {
/**
* 底层就是ribbon
*/
@Autowired
LoadBalancerClient loadBalancerClient;
@GetMapping("/hello")
public String hello(String name){
ServiceInstance serviceInstance = loadBalancerClient.choose("nacos-provider");
String url = serviceInstance.getUri() + "/test/sayHi?name=" + name;
String result = new RestTemplate().getForObject(url, String.class);
return "访问 : " + url + ", 返回 : " + result;
}
}
|
我们知道LoadBalancerClient的接口自由一个实现类:RibbonLoadBalancerClient。这个一看名称就知道和Ribbon有关,源码有兴趣可自行研究。
2.4、WebClient调用
首先添加其依赖:
1
2
3
4
| <dependency>
<groupId>org.springframework.boot</groupId>
<artifactId>spring-boot-starter-webflux</artifactId>
</dependency>
|
WebClient是Spring 5中最新引入的,可以将其理解为reactive版的RestTemplate。
1
2
3
4
5
6
7
8
9
10
11
12
13
14
15
16
17
18
19
20
21
22
23
24
| @RequestMapping("/webClient")
@RestController
public class WebClientController {
@Autowired
private WebClient.Builder webClientBuilder;
@GetMapping("/hello")
public Mono<String> hello(String name){
Mono<String> result = webClientBuilder.build()
.get()
.uri("http://nacos-provider/test/sayHi?name="+name)
.retrieve()
.bodyToMono(String.class);
return result;
}
@Bean
@LoadBalanced
public WebClient.Builder loadBalancedWebClientBuilder() {
return WebClient.builder();
}
}
|
自此重要代码都写好了,来测试一下。
四、测试消费者与生产者
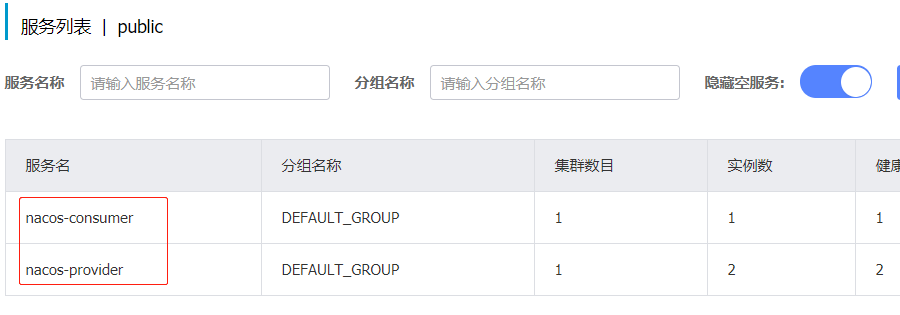
为了实现负载均衡,生产者(提供者,name=nacos-provider)分别以:8810、8811端口启动,消费者(name=nacos-consumer)以8801端口启动。

请求接口:
1
2
3
4
5
6
7
8
9
10
11
|
GET http://localhost:8801/feign/hello?name=rstyro
GET http://localhost:8801/rest/hello?name=rstyro
GET http://localhost:8801/ribbon/hello?name=rstyro
GET http://localhost:8801/webClient/hello?name=rstyro
|

在我们请求的时候,客户端是以轮询的方式请求生产者,实现一个负载均衡的操作。
1、完整代码
2、参考链接


