单机版比较简单,试下集群版的,资源有限,本文例子:一台主机以不同端口启动搭建集群。
环境说明:
Centos7
Elasticsearch7.9.0
准备搭建3个节点
一、下载ES安装包 去官网下载
选择7.9.0版本下载Linux x86_64类型的 ,x86_64 与 AARCHS 区别不明白的自己科普一下。
执行Shell命令过程:
1 2 3 4 5 6 7 8 9 10 11 12 13 14 wget https://artifacts.elastic.co/downloads/elasticsearch/elasticsearch-7.9.0-linux-x86_64.tar.gz tar -zxvf elasticsearch-7.9.0-linux-x86_64.tar.gz mkdir elasticsearch-cluster cp -r elasticsearch-7.9.0 elasticsearch-cluster/elasticsearch-9301 cp -r elasticsearch-7.9.0 elasticsearch-cluster/elasticsearch-9302 cp -r elasticsearch-7.9.0 elasticsearch-cluster/elasticsearch-9303
看我复制的文件就知道,我打算启动3个节点,启动端口分别是: 9301、9302、9303
二、修改节点的配置文件 常用配置文件解释
1 2 3 4 5 6 7 8 9 10 11 12 13 14 15 16 17 18 19 20 21 22 23 24 25 26 27 28 29 30 31 32 33 34 35 36 37 38 39 40 41 42 43 44 45 46 47 48 49 50 51 52 53 cluster.name: mtSearch node.name: mtNode1 node.master: true node.data: true path.logs: /opt/elasticsearch-cluster/logs bootstrap.memory_lock: true network.host: 172.16 .1 .236 http.port: 9200 transport.tcp.port: 9300 transport.tcp.compress: true discovery.seed_hosts: ["172.16.1.236:9300" ,"172.16.1.236:9301" ,"172.16.1.236:9302" ]discovery.zen.minimum_master_nodes: 2 discovery.seed_providers: file cluster.initial_master_nodes: ["mtNode1" , "mtNode2" , "mtNode3" ]gateway.recover_after_nodes: 2 http.cors.enabled: true http.cors.allow-origin: "*"
1、各节点配置文件 每个节点的配置都不太相同
9301节点配置 1 2 3 4 5 6 7 8 9 10 11 12 13 14 cluster.name: mtSearch node.name: mtNode1 node.master: true node.data: true path.logs: /opt/elasticsearch-cluster/logs network.host: 172.16.1.236 http.port: 9201 transport.tcp.port: 9301 transport.tcp.compress: true discovery.seed_hosts: ["172.16.1.236:9300","172.16.1.236:9301","172.16.1.236:9302"] cluster.initial_master_nodes: ["mtNode1","mtNode2","mtNode3"] gateway.recover_after_nodes: 2 http.cors.enabled: true http.cors.allow-origin: "*"
9302节点配置 1 2 3 4 5 6 7 8 9 10 11 12 13 14 cluster.name: mtSearch node.name: mtNode2 node.master: true node.data: true path.logs: /opt/elasticsearch-cluster/logs network.host: 172.16.1.236 http.port: 9202 transport.tcp.port: 9302 transport.tcp.compress: true discovery.seed_hosts: ["172.16.1.236:9300","172.16.1.236:9301","172.16.1.236:9302"] cluster.initial_master_nodes: ["mtNode1","mtNode2","mtNode3"] gateway.recover_after_nodes: 2 http.cors.enabled: true http.cors.allow-origin: "*"
9303节点配置 1 2 3 4 5 6 7 8 9 10 11 12 13 14 cluster.name: mtSearch node.name: mtNode3 node.master: true node.data: true path.logs: /opt/elasticsearch-cluster/logs network.host: 172.16.1.236 http.port: 9203 transport.tcp.port: 9303 transport.tcp.compress: true discovery.seed_hosts: ["172.16.1.236:9300","172.16.1.236:9301","172.16.1.236:9302"] cluster.initial_master_nodes: ["mtNode1","mtNode2","mtNode3"] gateway.recover_after_nodes: 2 http.cors.enabled: true http.cors.allow-origin: "*"
都配置完,分别启动3个节点,不出意外即可看到集群连接成功。
1
2
3
/opt/elasticsearch-cluster/elasticsearch-9301/elasticsearch -d /opt/elasticsearch-cluster/elasticsearch-9302/elasticsearch -d /opt/elasticsearch-cluster/elasticsearch-9303/elasticsearch -d
启动成功,如下图:
如果你之前没安装过,可能会报错:像root用户运行呀,线程不够呀,内存不足呀等等问题
集群确实是搞定了,但是没配置账号密码,集群中各节点之间的通信是也没有什么校验措施的,别人随随便便就连上集群。这样在互联网中就相当于裸奔!
三、配置证书 TLS需要X.509证书才能对与之通信的应用程序执行加密和身份验证。为了使节点之间的通信真正安全,必须对证书进行验证。在Elasticsearch集群中验证证书真实性的推荐方法是信任签署证书的证书颁发机构(CA)。这样,将节点添加到群集时,它们只需要使用由同一CA签名的证书,即可自动允许该节点加入群集。
1、生成节点证书 命令 elasticsearch-certutil 简化了生成证书的过程,它负责生成CA并与CA签署证书。
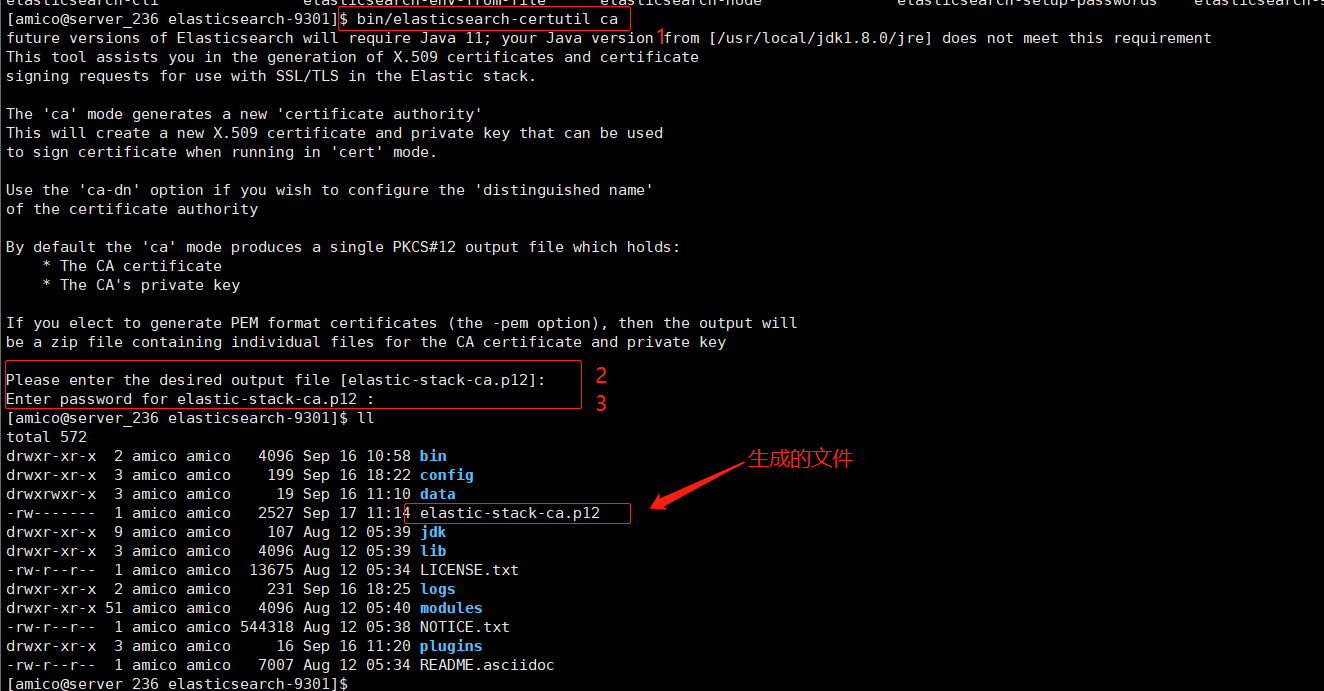
a、创建证书颁发机构CA elasticsearch-certutil 命令即可,如下
1 2 3 bin/elasticsearch-certutil ca
执行这个命令之后:
会让你输入生成elastic-stack-ca.p12文件放在哪。(直接回车,放在当前目录)
回车之后让你输入密码,该密码是让你保护文件和密钥的。如果你以后还要加集群的话,要记得输入的密码。
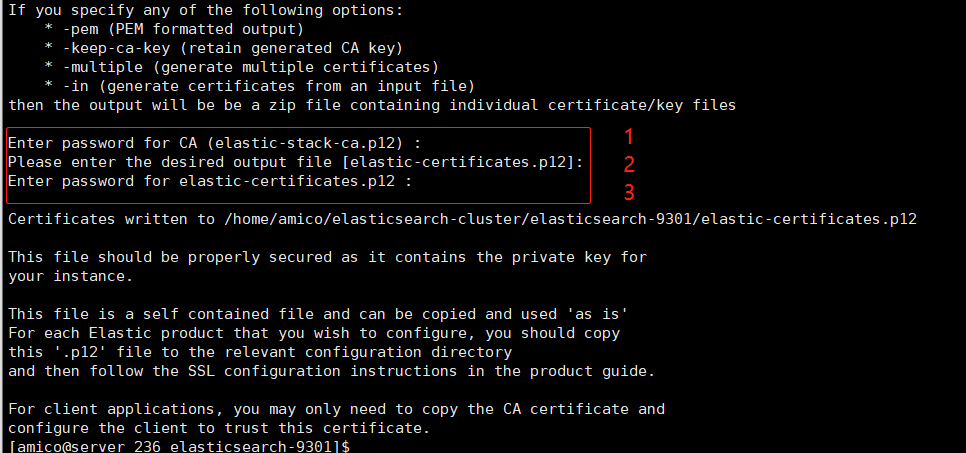
b、生成证书和私钥
1 2 bin/elasticsearch-certutil cert --ca elastic-stack-ca.p12
执行命令之后需要你操作3次:
第一次,输入上面生成CA的密码,没有设置直接回车
第二次,生成的文件路径,直接回车
第三次,生成这次证书与私钥文件的密码,建议和上面生成CA一致(怕忘记密码,也可以直接回车)
如下图需要输入密码的地方:
命令执行完之后会生成一个elastic-certificates.p12 文件,这个就是各节点通信的凭证
只需要一个节点生成凭证即可。
2、配置证书 复制证书凭证 把证书凭证复制到各个节点一份
1 2 3 4 cp elastic-certificates.p12 /opt/elasticsearch-cluster/elasticsearch-9301/config/ cp elastic-certificates.p12 /opt/elasticsearch-cluster/elasticsearch-9302/config/ cp elastic-certificates.p12 /opt/elasticsearch-cluster/elasticsearch-9303/config/
修改配置文件 在各个节点下的elasticsearch.yml文件添加如下配置
1
2
3
4
5
6
xpack.security.enabled: true xpack.security.authc.accept_default_password: true xpack.security.transport.ssl.enabled: true xpack.security.transport.ssl.verification_mode: certificate xpack.security.transport.ssl.keystore.path: /opt/elasticsearch-cluster/elasticsearch-9301/config/elastic-certificates.p12 xpack.security.transport.ssl.truststore.path: /opt/elasticsearch-cluster/elasticsearch-9301/config/elastic-certificates.p12
要注意的是上面的path记得改成对应节点config下的elastic-certificates.p12。
添加密码到密码库 因为之前生成CA 和生成凭证都设置了密码,所以把密码添加到密钥库中
1 2 3 4 5 6 7 8 9 10 11 12 elasticsearch-9301/bin/elasticsearch-keystore add xpack.security.transport.ssl.keystore.secure_password elasticsearch-9301/bin/elasticsearch-keystore add xpack.security.transport.ssl.truststore.secure_password elasticsearch-9302/bin/elasticsearch-keystore add xpack.security.transport.ssl.keystore.secure_password elasticsearch-9302/bin/elasticsearch-keystore add xpack.security.transport.ssl.truststore.secure_password elasticsearch-9303/bin/elasticsearch-keystore add xpack.security.transport.ssl.keystore.secure_password elasticsearch-9303/bin/elasticsearch-keystore add xpack.security.transport.ssl.truststore.secure_password
图片上有个警告大概的意思是说:ES未来将使用JDK11,而我现在的环境还是JDK8
之后启动各个节点
1
2
3
elasticsearch-9301/bin/elasticsearch -d elasticsearch-9302/bin/elasticsearch -d elasticsearch-9303/bin/elasticsearch -d
可以看看日志,不出意外集群启动成功了。随便请求一个节点地址:http://172.16.1.236:9201/ 也可以使用elasticsearch-head 连接查看,但是需要账户和密码访问
在安装Elasticsearch时,如果内置用户elastic用户没有密码,它将使用默认的引导密码。引导程序密码是一个临时密码,从随机 keystore.seed 设置派生的会在安装过程中添加到密钥库中。我们压根不知道密码是啥,所以需要为内置用户elastic设置密码。首次设置可以用elasticsearch-setup-passwords命令
Tip:下面的方法,我没试过,我没试过、我没试过,但是文档有,就提一下。
1 2 3 4 5 POST _nodes/reload_secure_settings { "secure_settings_password": "yourPassword" }
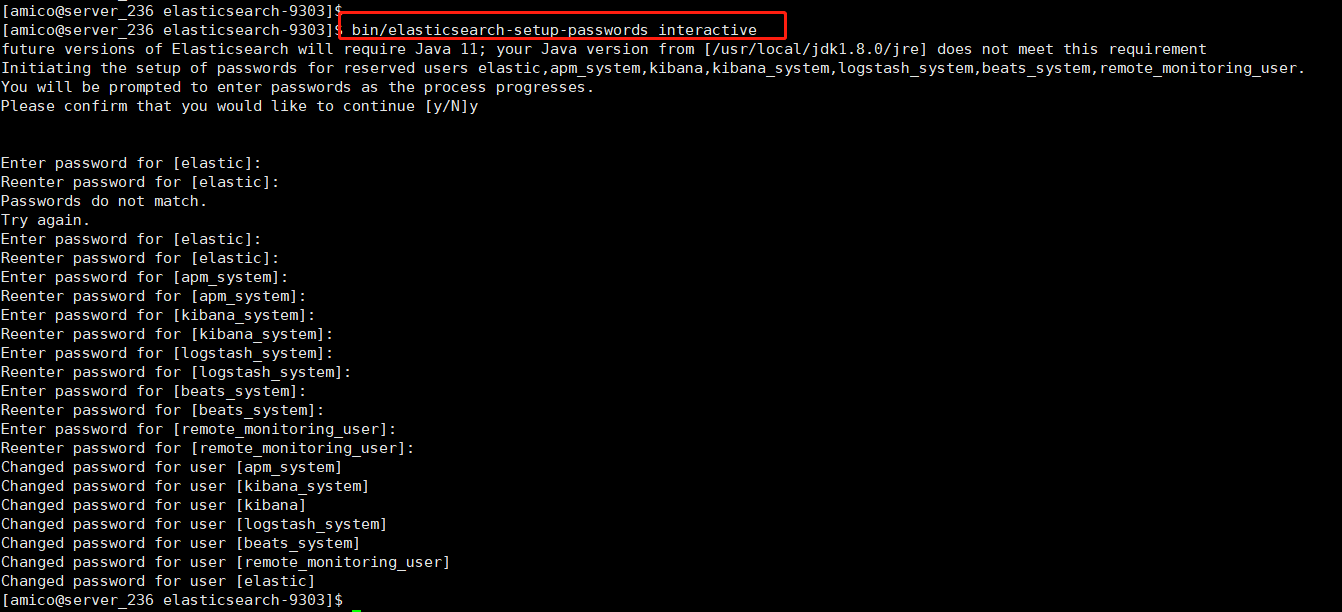
3、配置密码 elasticsearch-setup-passwords工具是首次设置内置用户密码的最简单方法。它使用elastic用户的引导程序密码来运行用户管理API请求。
1 bin/elasticsearch-setup-passwords interactive
它在“互动”模式下提示你输入:elastic,kibana_system,logstash_system,beats_system,apm_system,和remote_monitoring_user用户的密码
至此ES集群的账号跟密码就设置完成了
我们设置密码之后会有一个名为.security-7的索引文档。
之后可以修改密码:
1 2 3 4 5 6 7 8 POST http://172.16.1.236:9201/_xpack/security/user/elastic/_password { "password": "yourNewPassword" }
4、踩坑记录 1、安装可能报错的问题: 查看文章链接:ES安装问题集锦
2、修改运行ES的Java环境 在启动ES7.9.0的时候,会提示:future versions of Elasticsearch will require Java 11; your Java version from [/usr/local/jdk1.8.0/jre] does not meet this requirement 也就是说ES未来版本需要JDK11,我目前的环境是JDK8不符合要求。我这个包是自带JDK的,我干脆只把把自动的JDK指定为ES的JDK运行环境:
1 2 3 export JAVA_HOME=/opt/elasticsearch-cluster/elasticsearch-9301/jdk export PATH=$JAVA_HOME/bin:$PATH
不修改也是可以启动的,但是建议改算了,毕竟官方包都自带了,那肯定是推荐我们使用新版本。
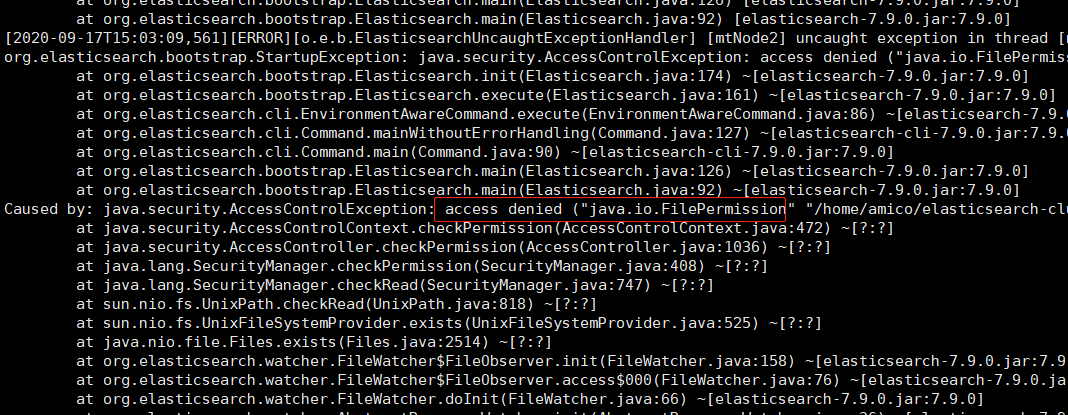
3、elastic-certificates.p12文件位置踩坑
因为我只是一台主机,打算是另外把这个证书凭证放在 elasticsearch-cluster 下弄个config文件夹保存的,但是呢,不尽人意
启动的时候报了个文件权限问题。报错如下
可能用chmod 777 elastic-certificates.p12可以访问,我没试,但是还是建议放在各自的安装目录下。
本文参考链接