前言
SSH Key 是一种用于身份验证的加密密钥对,能够实现免密码登录远程服务器或代码托管平台(如 GitHub、GitLab 等)。如何在一台电脑上生成并管理多个 SSH Key,以满足不同服务(公司 Git、GitHub、Gitee 等)的使用需求,并涵盖 SSH 免密登录的配置方法。
一、生成第一个 SSH Key
1、检查是否已有 SSH Key
打开终端,进入 SSH 配置目录并查看已有密钥文件
1 | # 进入ssh-key 目录 |
如果存在 id_rsa 和 id_rsa.pub 文件,则表示已生成过密钥对。若无需保留,可先备份或删除后再重新生成。
2、创建 SSH Key
使用 ssh-keygen 命令生成新密钥对:
1 | ssh-keygen -t rsa -C "your_email@example.com" |
参数说明:
-t:指定密钥类型,默认 RSA,可省略。-C:注释文字,通常填写邮箱,便于识别。-f:指定密钥文件名(如需生成多个密钥,此参数必用)。
执行后系统会提示输入密码(passphrase),该密码用于保护私钥,每次使用需输入;若不想设置,直接按回车跳过。
默认生成的文件为 ~/.ssh/id_rsa(私钥)和 ~/.ssh/id_rsa.pub(公钥)
3、将公钥添加到 GitHub
- 复制公钥内容:
cat ~/.ssh/id_rsa.pub,复制输出的全部文本。 - 登录 GitHub,进入 Settings → SSH and GPG keys → New SSH key,粘贴公钥并保存。
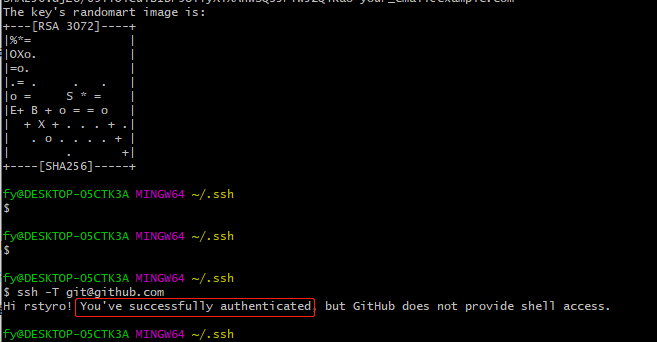
4、验证连接
1 | # 验证是否成功 |
二、同一台电脑生成多个ssh-key
一般人都有个公司git、github、gitee之类的,搞多个ssh-key是很有必要的。
1、生成新的ssh-key
1 | # new_id_rsa 就是你要新生成ssh-key的名字 |
此时会生成 ~/.ssh/new_id_rsa(私钥)和 ~/.ssh/new_id_rsa.pub(公钥)。
2、添加新生成的ssh-key
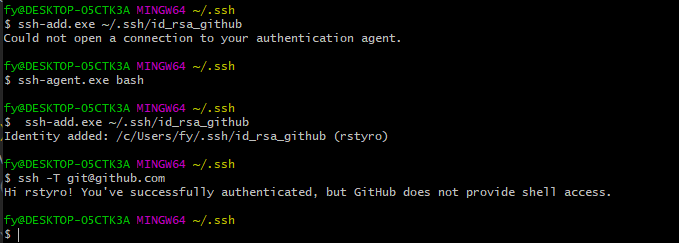
默认ssh只会读取 id_rsa,所以为了让ssh识别新的ssh-key,需要将其添加到 SSH Agent
1 | # 启动 ssh-agent 并添加密钥 |
如果出现Could not open a connection to your authentication agent. 可执行
1 | # 需要ssh-agent启动bash,或者说把bash挂到ssh-agent下面 |
当然不需要的时候 你也可以使用
1 | # 删除所有管理的密钥 |
3、配置config文件
1 | # 查看是否存在config文件 |
如果已经存在则编辑如下:
1 | Host github |
名词解释
1 | Host 是自己定义的名字 |
当使用的时候要注意一点
如果你host 和hostName 不一样的话,**你clone 的时候要使用的是你上面config文件配置的host而不是hostName.**如下图: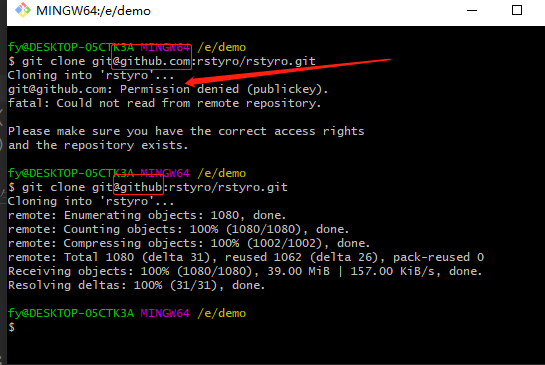
4、验证
1 | ssh -T git@github.com |
三、SSH 免密登录远程服务器
除了代码托管平台,SSH Key 也常用于 Linux 服务器的免密登录。以下以 192.168.1.50(源终端)向目标服务器 192.168.1.54、192.168.1.55 配置免密登录为例。
1 | # 1.原终端生成密钥对 |
简化后续连接命令
为避免每次输入完整 IP 和用户名,可在源终端(192.168.1.50)的 ~/.ssh/config 文件中配置 SSH 客户端,编辑 ~/.ssh/config 文件:
1 | Host server54 |
保存后,今后只需在 192.168.1.50 上执行:
1 | ssh server54 |
即可快速连接,体验免密便捷登录。