一、创建Sonatype账户 去这个地址注册一个账号:https://issues.sonatype.org/secure/Dashboard.jspa
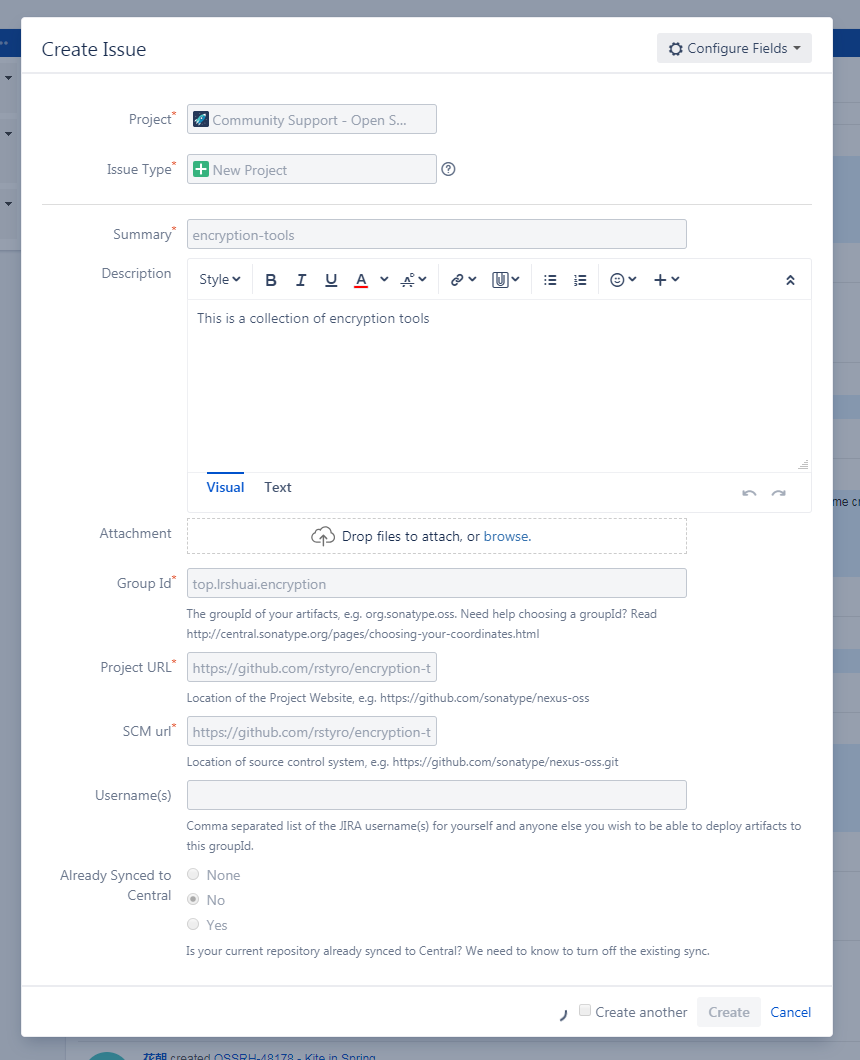
二、创建一个Issues 登录Sonatype网站 ,创建一个Issues,直接点击Create按钮即可,如下图:
projectCommunity Suport - Open Source Project Repository Hosting
Issue TypeNew Project
Summary
Description
Group Id
Project URL
SCM urlhttps://github.com/rstyro/encryption-tools.git
如下示例图:
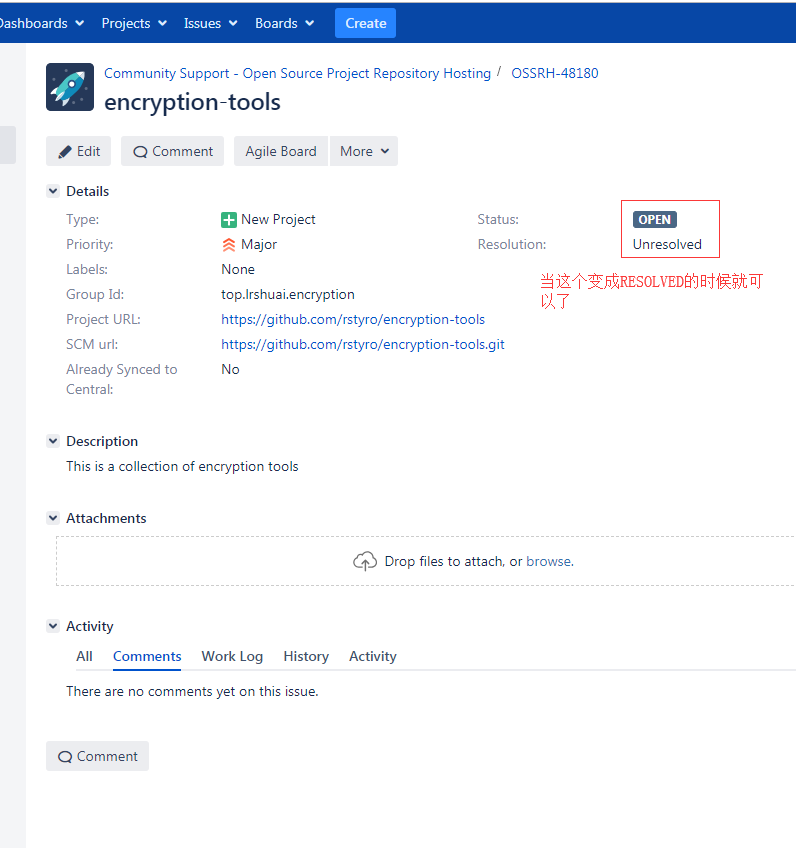
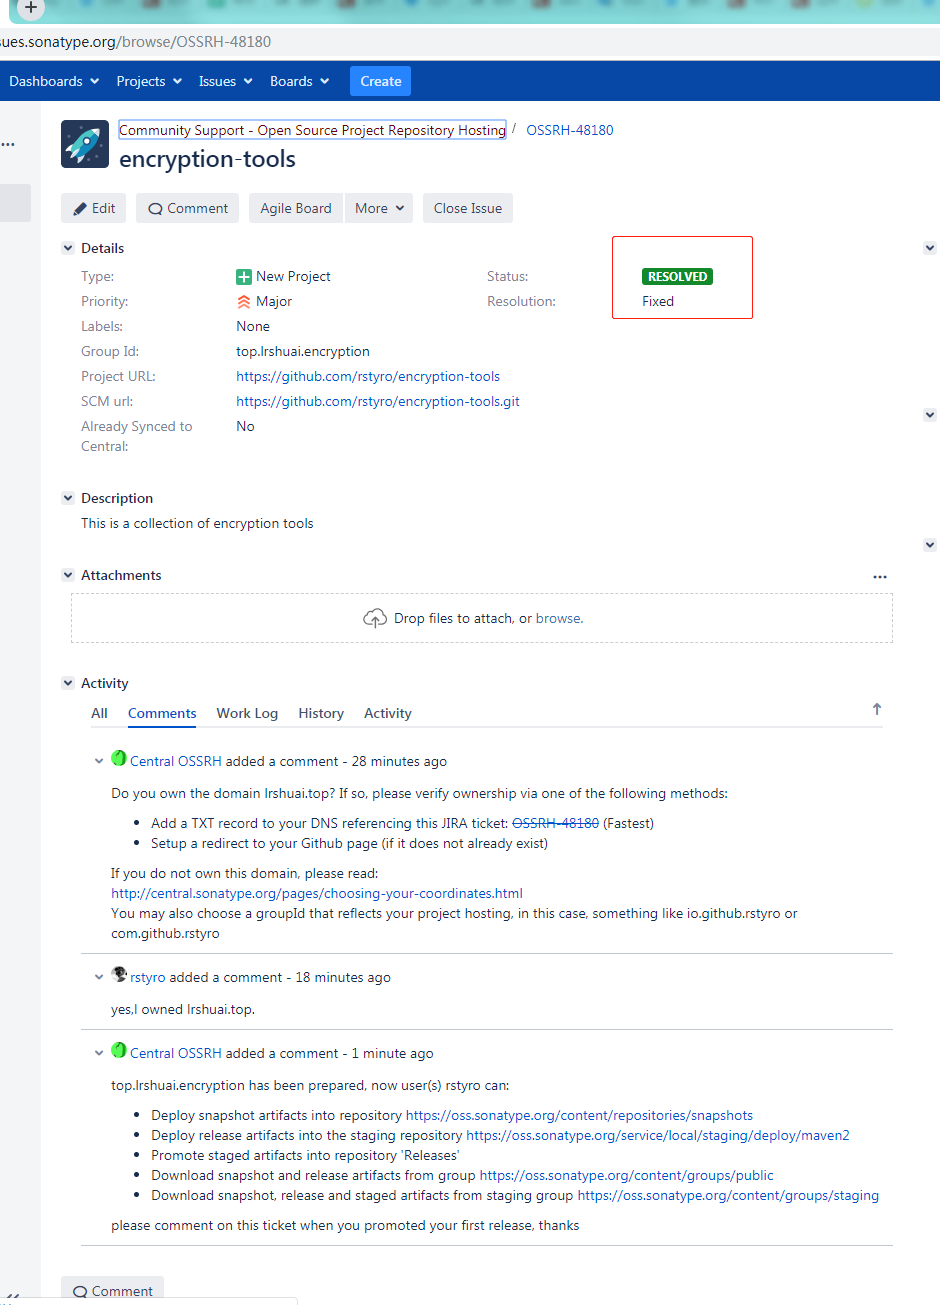
三、等待工作人员审核 点击Issues 下面可看到,刚才创建的Issues,查看状态,如果状态变成RESOLVED即可下一步
如果你的Group Id写的是你自己的域名,可能会有工作人员询问你是否是你自己的域名io.github.yourname 或者 com.github.yourname 这样的Group Id.
四、PGP安装及生成密钥
一脸懵逼,PGP是什么鬼,干嘛用?
目的:是签名构建用的,为了保证你的构件不被第三方篡改,用于校验。
1、下载
2、安装
3、生成密钥对
查询是否安装成功
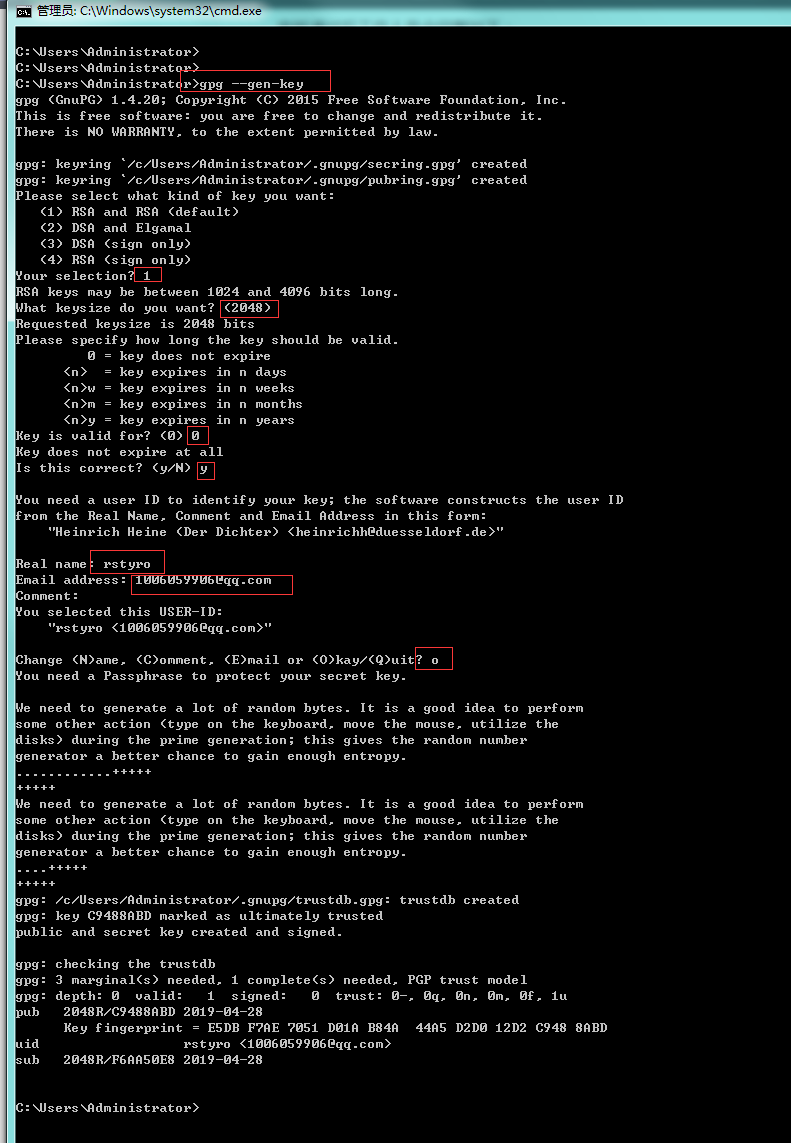
生成密钥对
Please select what kind of key you want:
RSA keys may be between 1024 and 4096 bits long.
Please specify how long the key should be valid.
Real name
Email address
Comment
Change (N)ame, (C)omment, (E)mail or (O)kay/(Q)uit?
you need a passphrase to protect your secret key
如果有默认值直接回车也可,或者调写括号内的值,示例图如下:
最后的打印输出:
1
2
3
4
5
6
7
8
9
10
11
gpg: /c/Users/Administrator/.gnupg/trustdb.gpg: trustdb created gpg: key C9488ABD marked as ultimately trusted public and secret key created and signed. gpg: checking the trustdb gpg: 3 marginal(s) needed, 1 complete(s) needed, PGP trust model gpg: depth: 0 valid: 1 signed: 0 trust: 0-, 0q, 0n, 0m, 0f, 1u pub 2048R/C9488ABD 2019-04-28 Key fingerprint = E5DB F7AE 7051 D01A B84A 44A5 D2D0 12D2 C948 8ABD uid rstyro <1006059906@qq.com> sub 2048R/F6AA50E8 2019-04-28
4、将公钥发布到 PGP 密钥服务器 1 2 3 4 5 # 公钥发布PGP 密钥服务器 gpg --keyserver hkp://pool.sks-keyservers.net --send-keys C9488ABD # 查询公钥是否发布成功 gpg --keyserver hkp://pool.sks-keyservers.net --recv-keys C9488ABD
此后,可使用本地的私钥来对上传构件进行数字签名,而下载该构件的用户可通过上传的公钥来验证签名,也就是说,大家可以验证这个构件是否由本人上传的,因为有可能该构件被坏人给篡改了
五、修改Maven配置文件 1、settings.xml
该文件为Maven的配置文件,在Maven安装目录下的conf文件夹下
修改 Maven settings.xml 文件,中的servers 节点中添加1 2 3 4 5 <server> <id>oss</id> <username>Sonatype 用户名</username> <password>Sonatype 密码</password> </server>
2、pom.xml 修改pom文件
1 2 3 4 5 6 7 8 9 10 11 12 13 14 15 16 17 18 19 20 21 22 23 24 25 26 27 28 29 30 31 32 33 34 35 36 37 38 39 40 41 42 43 44 45 46 47 48 49 50 51 52 53 54 55 56 57 58 59 60 61 62 63 64 65 66 67 68 69 70 71 72 73 74 75 76 77 78 79 80 81 82 83 84 85 86 87 88 89 90 91 92 93 94 95 96 97 98 99 100 101 102 103 104 105 106 107 108 109 110 111 112 113 114 115 116 117 118 119 120 121 122 123 124 125 126 127 128 129 130 131 132 133 134 135 136 137 138 139 140 141 142 143 144 145 146 147 148 149 150 151 <?xml version="1.0" encoding="UTF-8" ?> <project xmlns ="http://maven.apache.org/POM/4.0.0" xmlns:xsi ="http://www.w3.org/2001/XMLSchema-instance" xsi:schemaLocation ="http://maven.apache.org/POM/4.0.0 http://maven.apache.org/xsd/maven-4.0.0.xsd" > <modelVersion > 4.0.0</modelVersion > <name > encryption-tools</name > <description > This is a collection of encryption tools </description > <url > https://github.com/rstyro/encryption-tools</url > <groupId > top.lrshuai.encryption</groupId > <artifactId > encryption-tools</artifactId > <version > 1.0.0</version > <developers > <developer > <name > rstyro</name > <email > 1006059906@qq.com</email > </developer > </developers > <licenses > <license > <name > The MIT License</name > <url > http://opensource.org/licenses/MIT</url > </license > </licenses > <scm > <connection > scm:git:git@github.com:rstyro/encryption-tools.git</connection > <developerConnection > scm:git:git@github.com:rstyro/encryption-tools.git</developerConnection > <url > git@github.com:rstyro/encryption-tools.git</url > </scm > <profiles > <profile > <id > dev</id > <properties > <profiles.active > dev</profiles.active > </properties > <activation > <activeByDefault > true</activeByDefault > </activation > </profile > <profile > <id > release</id > <properties > <profiles.active > release</profiles.active > </properties > <distributionManagement > <snapshotRepository > <id > oss</id > <url > https://oss.sonatype.org/content/repositories/snapshots/</url > </snapshotRepository > <repository > <id > oss</id > <url > https://oss.sonatype.org/service/local/staging/deploy/maven2/</url > </repository > </distributionManagement > </profile > <profile > <id > beta</id > <properties > <profiles.active > beta</profiles.active > </properties > </profile > </profiles > <build > <plugins > <plugin > <groupId > org.apache.maven.plugins</groupId > <artifactId > maven-compiler-plugin</artifactId > <configuration > <source > 1.7</source > <target > 1.7</target > </configuration > </plugin > <plugin > <groupId > org.apache.maven.plugins</groupId > <artifactId > maven-source-plugin</artifactId > <version > 3.0.0</version > <configuration > <attach > true</attach > </configuration > <executions > <execution > <phase > compile</phase > <goals > <goal > jar</goal > </goals > </execution > </executions > </plugin > <plugin > <groupId > org.apache.maven.plugins</groupId > <artifactId > maven-javadoc-plugin</artifactId > <version > 2.9.1</version > <executions > <execution > <phase > package</phase > <goals > <goal > jar</goal > </goals > </execution > </executions > </plugin > <plugin > <groupId > org.apache.maven.plugins</groupId > <artifactId > maven-gpg-plugin</artifactId > <version > 1.5</version > <executions > <execution > <phase > verify</phase > <goals > <goal > sign</goal > </goals > </execution > </executions > </plugin > </plugins > </build > <dependencies > <dependency > <groupId > commons-codec</groupId > <artifactId > commons-codec</artifactId > <version > 1.12</version > </dependency > <dependency > <groupId > org.bouncycastle</groupId > <artifactId > bcprov-jdk15on</artifactId > <version > 1.58</version > </dependency > </dependencies > </project >
pom需要配置的属性:
name: 项目名称。
description: 项目描述。
url: 项目地址
licenses: 开源协议。
developers: 开发者列表。
scm: 项目的git地址相关。
profiles: 配置不同的环境。比如开发环境 测试环境 发布环境。
groupId: 定义当前maven项目隶属的实际项目。
artifactId: 该元素定义实际项目中的一个Maven项目(模块).
version: 版本号, 带SNAPSHOT为快照版本,否则为 release 版本。
build: 插件。需要加上maven-source-plugin、maven-javadoc-plugin、maven-gpg-plugin三个插件
dependencies: 依赖的模块
六、发布控件 1、发布到OSS 进入到开源项目的根目录运行如下命令:
命令mvn clean deploy -P release -Dgpg.passphrase=你的Passphase
你的Passphase:就是你在第四步,生成密钥对输入的secrt
2、在OSS发布到中央仓库
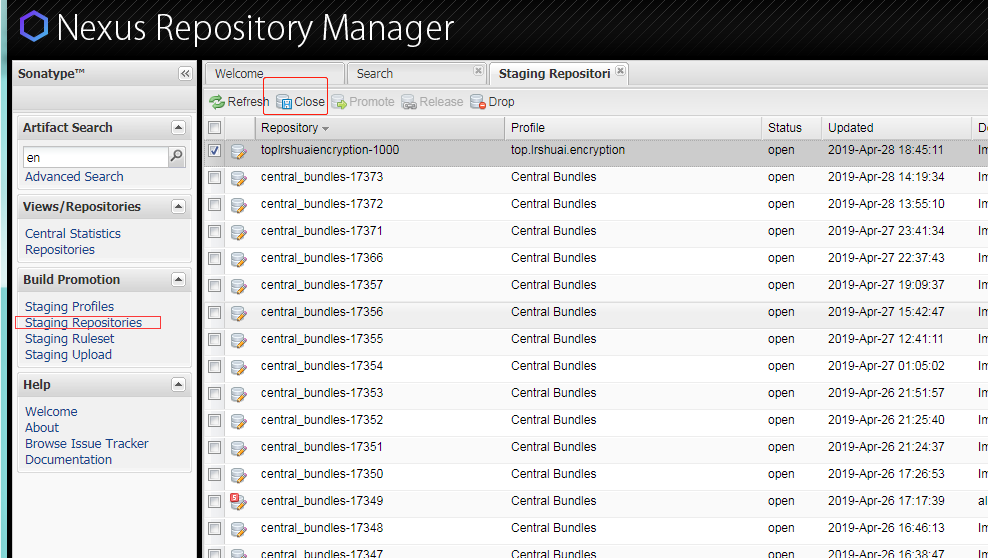
进入:https://oss.sonatype.org 并登陆,点击左侧 Staging Repositories(暂存的存储库) 按钮
状态应该是open,你要将其置为closed,点击上方的close按钮即可
接下来系统会自动验证有效性,如果你的Group Id和pom.xml没有错误,状态会自动变成closed
如果成功变成Closed 就可以发布了,点击Release进行发布,ok
如果有问题,会在下面提示你那里有问题,加入有问题你可以点击drop按钮删掉这个构件,然后重新发布
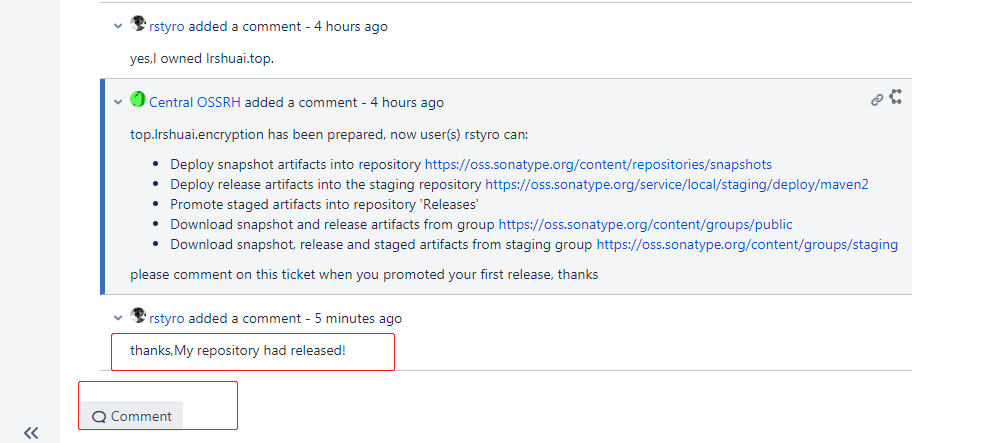
3、通知 Sonatype 构件已成功发布
在comment中回复你已经成功发布,比如:My repository had released!
在Issue下面回复一条“构件已成功发布”的评论,这是为了通知 Sonatype 的工作人员为需要发布的构件做审批,发布后会关闭该Issue。
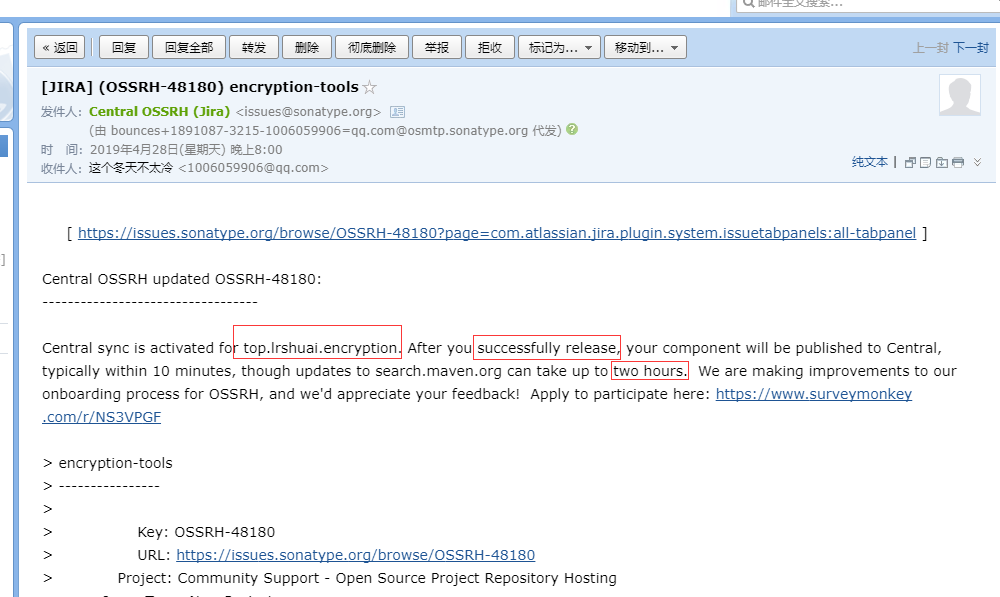
4、等待审批
当审批通过后,将会收到邮件通知。然后去 maven的中央仓库中搜索到自己发布的构件,看是否存在
至此就结束了
七、升级控件 当修改完成之后,直接走 第六 步骤进行构建发布即可。

