0%

Centos 防火墙相关命令

覆盖日常运维高频防火墙操作,附异常解决 + 网络配置避坑指南,收藏即用!

一、CentOS 6:经典 iptables 防火墙操作

CentOS 6 采用 iptables 作为默认防火墙,以下是日常运维最常用的命令及异常处理方案,命令可直接复制执行。

1. 核心端口操作命令

1
2
3
4
5
6
7
8
9
10
11
12
13
# 查看防火墙状态(含已开放端口)
service iptables status

# 临时开放 8080 端口(重启防火墙失效)
/sbin/iptables -I INPUT -p tcp --dport 8080 -j ACCEPT

# 永久开放 8080 端口(推荐,修改配置文件)
# 编辑配置文件
vi /etc/sysconfig/iptables
# 在文件中添加一行(建议放在 ACCEPT 相关规则后)
-A INPUT -p tcp -m tcp --dport 8080 -j ACCEPT
# 保存后重启防火墙生效
service iptables restart

2. 防火墙启停与开机自启配置

1
2
3
4
5
6
7
8
9
10
11
# 启动防火墙
service iptables start

# 关闭防火墙
service iptables stop

# 永久关闭防火墙(禁止开机启动)
chkconfig iptables off

# 永久开启防火墙(开机自启)
chkconfig iptables on

3. 常见异常及修复方案

有时候,你可能会遇到以下情况:

1
2
3
4
5
6
7
# 现象1:执行开启/关闭命令没有任何提示
[root@host ~]# service iptables start
[root@host ~]# service iptables stop

# 现象2:查看状态提示模块未加载
[root@host ~]# service iptables status
iptables: Firewall modules are not loaded.

修复方法:手动加载必要的内核模块。

1
2
3
4
5
6
7
8
9
10
11
12
# 1. 加载核心模块(顺序无关)
modprobe ip_tables # 加载 iptables 核心模块
modprobe iptable_filter # 加载过滤规则模块

# 2. 验证模块是否加载成功
lsmod | grep iptable
# 出现以下输出即表示成功
# iptable_filter 2173 0
# ip_tables 9567 1 iptable_filter

# 3. 重新操作防火墙即可正常生效
service iptables start

二、CentOS 7/8: firewalld 防火墙操作(取代iptables)

CentOS 7 全面采用 firewalld 替代传统 iptables,配置逻辑更清晰,支持动态生效(无需重启服务),以下是高频操作命令。

1、防火墙服务管理(使用 systemctl

1
2
3
4
5
6
7
8
9
10
11
12
13
14
15
16
17
18
19
20
# 查看防火墙状态
systemctl status firewalld
# 或
firewall-cmd --state

# 启动防火墙
systemctl start firewalld

# 停止防火墙
systemctl stop firewalld

# 重启防火墙(使配置生效)
firewall-cmd --reload # 重载配置(不断开现有连接)
# firewall-cmd --complete-reload # 完全重载(断开连接,更彻底)

# 禁止防火墙开机自启
systemctl disable firewalld

# 启用防火墙开机自启
systemctl enable firewalld

2、端口操作命令

1
2
3
4
5
6
7
8
9
10
11
12
13
14
15
16
17
18
19
20
# 查看所有已开放的端口
firewall-cmd --list-ports

# 临时开放80端口(重启firewalld后失效)
firewall-cmd --zone=public --add-port=80/tcp

# 永久开放80端口
firewall-cmd --zone=public --add-port=80/tcp --permanent

# 开放一个端口范围(如8080-9090)
firewall-cmd --zone=public --add-port=8080-9090/tcp --permanent

# 查询指定端口是否开放
firewall-cmd --zone=public --query-port=80/tcp

# 关闭指定端口(永久)
firewall-cmd --zone=public --remove-port=80/tcp --permanent

# 注意:任何带有 --permanent 参数的修改后,都需要执行重载才能生效
firewall-cmd --reload

关键参数解读

参数 说明
--zone 作用域(zone),最常用的是 public(公共区域)
--add-port 添加端口,格式为 端口号/协议(如 80/tcp, 53/udp
--permanent 永久生效。不加此参数则为运行时配置,重启后失效
--reload 重载配置,使永久规则生效,且不断开现有连接

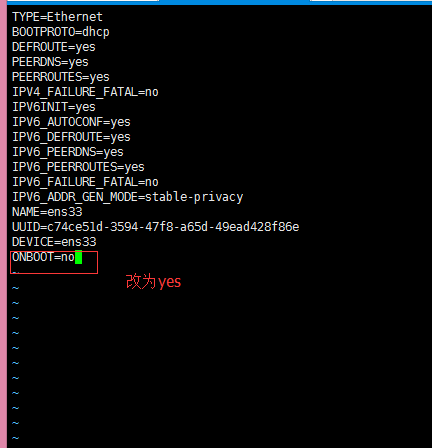
三、CentOS 7 最小化安装上网问题解决方案

我之前经常使用CentOS 7最小化安装虚拟机,经常出现无法上网问题,这里也记录一下。

根本原因在于:最小化安装后,网卡默认是禁用的。

解决方案:一键启用网卡。

1
2
3
4
5
6
7
8
# 1. 编辑网卡配置文件(网卡名通常是ens33、eth0等,请根据实际情况修改)
vi /etc/sysconfig/network-scripts/ifcfg-ens33

# 2. 找到 ONBOOT=no 这一行,将其改为:
ONBOOT=yes

# 3. 保存退出,并重启网络服务
systemctl restart network

操作示意

补充一个常用命令

CentOS 7 最小化安装默认移除了 ifconfig 命令(已过时),推荐使用 ip addr 替代

1
2
3
4
# 查看IP地址和网卡信息
ip addr
# 或使用简写
ip a

若习惯使用 ifconfig,可通过 yum install net-tools -y 命令安装(需先解决上网问题)

  • 正文到此结束!如果遇到其他防火墙 / 网络配置问题,欢迎在留言区补充说明场景,我会逐一解答~

  • 觉得有用的话,记得点赞 + 收藏,转发给身边需要的运维小伙伴!

您的打赏,是我创作的动力!不给钱?那我只能靠想象力充饥了。